DIY Floating Mantel (Build one out of Barn Wood!)
This post may contain affiliate links which won't change your price but will share some commission. Read more here.Easy instructions for building a DIY floating mantel out of reclaimed barn wood. Perfect for the rustic, repurposed look that’s so popular!

If you’ve read my blog for more than five minutes you know I’m not a decorator, designer or any other “d” words!
Yet somehow I’m learning to create a treasured home, one day, one area at a time.
As my DIY husband and I have spent the last 8 years transforming our home one project at a time, we’ve also figured out what we like.
More specifically, we love old wood. Anything repurposed from wood is a keeper at our house. The more unique the better!
Our church has property where we will eventually build a new campus. My husband saw potential in an old out building there and asked if he could have any wood he might find.
Yes and amen! Tim scored a huge beam that we turned into the floating mantel I’ve always longed for!

Before our kitchen remodel (read about how we took down a wall and gutted this space) I used the top of my childhood piano as a fake mantel.
When we took down the wall between the living room and kitchen we had to totally rethink this space. I had to let the piano go. None of my kids wanted it so I gave it to my niece for her children. Kept it in the family!
But now with this new space I had the opportunity to create a REAL mantel and I knew what I wanted.
I’m thrilled with this reclaimed barn wood floating mantel. Here’s my hubby to tell you all the details!
How to Build a DIY Floating Mantel out of Barn Wood
Materials:
Barn Wood
5-inch Disc Sander
60 Grit Sanding Disc</a
Fixed Base Router
2″ Flange
Black Steel Nipple Pipe Fitting
From Tim: This center piece is the one that really caught my attention and showed the most potential for a really beautiful project.
All of them came from a very old tobacco barn, but these are the only ones I could salvage, since the barn was still standing. The character, texture and variation of the wood was stunning!

Step One: Smooth surface of wood
After determining which face would attach to the wall, I begin the process of smoothing that surface as much as possible.
Here, I’m sanding with a Makita disk sander and a heavy duty 60-grit sanding disc. I only sanded this surface to, again, keep it as close to the wall as possible, when mounted.

Step Two: Trim end of wood
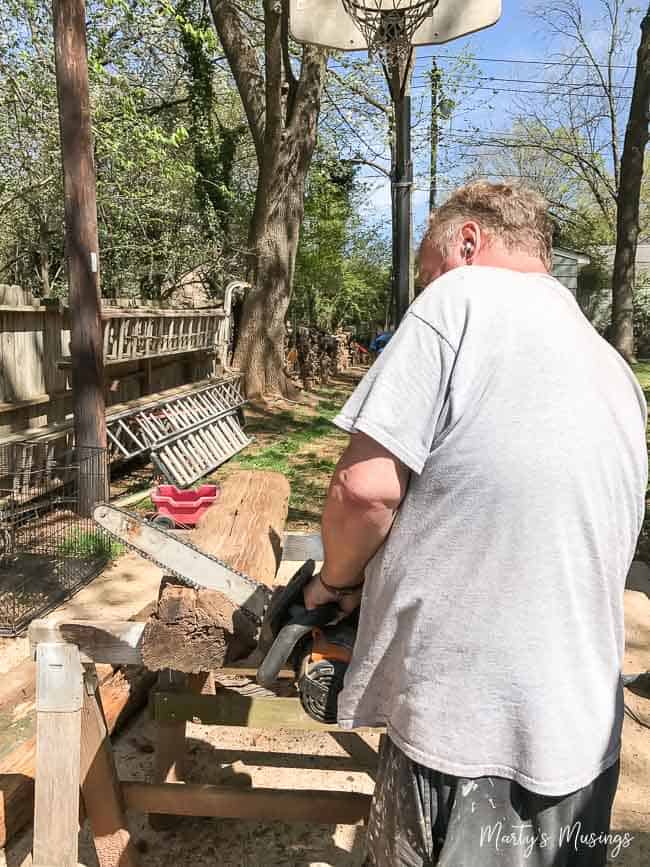
Naturally, there was more wood here than I really needed, so one end needed to be trimmed a bit. With a chainsaw, I made an imperfect cut, trying to mimic the rough cut on the other end. This wood was, incredibly, originally hand hewn with no power tools!

Step Three: Rout a channel in barn wood
Because of the mounting system I decided to use, that back side I sanded need to also be routed out to receive the flange on the wall. Again, the desire is to keep that face as close to the wall as possible.
Since, at this point, I wasn’t sure exactly where those two flanges would fall, I just routed a channel almost the length of the wood. This gave me maximum room for adjusting mounting spacing.

A close up of that channel. Didn’t have to be pretty, and only as deep as the flange itself.

Step Four: Attach flange to wall
So, with a piece of wood as heavy as this was, coupled with my desire to let it “float” on the wall, it was critical to have the mounting system attach right to the studs. There was no way simple sheetrock anchors, regardless the size, would hold this behemoth!
Once the appropriate studs were located, the threaded flanges were mounted to the wall at the right height and spacing.

Step Five: Drill holes in back of wood and determine placement
Now, unfortunately we have NO pictures of a really important step! Sometimes I ramp up and forget to call the photographer.
Drilling holes into the back of the wood where this threaded rod would land was the missing step. Spacing accuracy was critical, so the rod was threaded onto both flanges and it was time to ask for help!
The wood was held up to the installed rods, leveled and placed at the perfect spot, and the location of both rods was transferred onto the wood with a mark. I also marked the wall where the top of the beam landed so that I could determine the precise location for drilling holes in the back. When mounted, these holes would receive the threaded rods, and everything would be concealed and floating!
The holes were drilled with a power drill slightly larger and slightly deeper than the size of the rods. One really tricky part here was to drill the holes level. There’s no tool or trick to accomplish that, you just have to drill, insert a rod and check for level, and keep going. I know a picture would really help!

Step Six: Set mantel into place and secure
So, having successfully secured flanges and rods, drilled holes and cleaned everything up, the helpers returned and we lifted the mantle into place! It was amazing!
There was, I confess, some tweaking necessary in leveling the piece, but it all worked out in the end.
The last thing to do was secure the mantle to the wall with a couple long screw into those same studs used earlier. This would ensure that the whole mantle would not come crashing down on a guest’s head!

Marty: This barn wood mantel is the perfect accompaniment to the rest of our kitchen remodel. We have barn wood on the header (the structural piece needed where the wall was taken down) and fence board on our island.
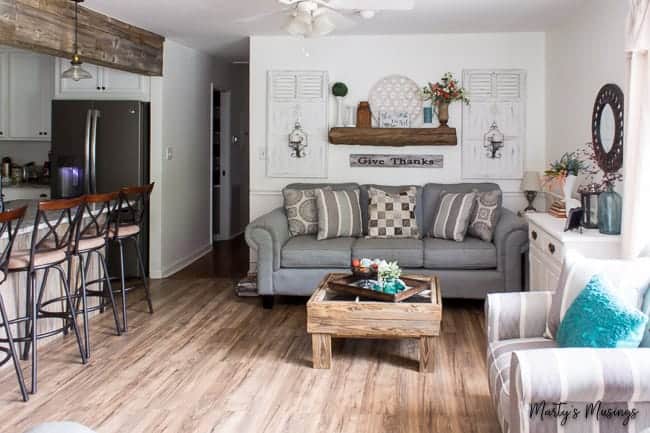
My husband did a great job bringing my dream of a DIY floating mantel to reality!

CLICK BELOW TO SEE THE OTHER POSTS IN OUR RANCH STYLE HOME KITCHEN REMODEL:
♥ Small Ranch Home Kitchen Remodel: The Dream Begins!
♥ How to Save Thousands of $$$ on a Kitchen Remodel
♥ 5 Practical Tips on How to Choose Flooring for Your Home
♥ How to Take Care of Your Pets During Your Remodel
♥ Set up a Temporary Kitchen During a Remodel
♥ How to Install Laminate Flooring: DIY Tips and Tricks
♥ How to Choose Kitchen Cabinet Hardware
♥ How to Build a Sliding Barn Door
♥ How to Remodel a Ranch Style Kitchen
♥ How to Build a DIY Floating Mantel (out of barn wood!) – you are here
What a cute and simple project. And wow that mantel is absolutely stunning, I bet it weighs a ton. You have good taste and your husband is very skilled.
Hi, Anita. My husband is quite the handy man! It’s definitely heavy but very secure!
Marty, I love this. It is perfect over your couch. Good to have such a great builder as your husband. Thank you
Yes, I’m thankful my husband is so good at figuring things out! Thanks for sharing this project!
Seeing this process is so inspiring! I love the rustic barn wood and how it adds to the personality of the home. Very impressive!
Thanks, Meegan! I always appreciate your encouraging words!
Wow! That floating mantel is gorgeous! We used reclaimed wood in our home remodel too for our island counter top. It makes such a statement. Maybe we should replace our mantel with reclaimed wood too? Hum? Just thinking…
Sounds great! We have reclaimed wood around our island and also facing out the beam (where we took out a wall) in our kitchen. We love it!
Oh, that’s STUNNING!!!!! We love using reclaimed wood in our decor too and I’ve been wondering how to make a floating shelf from a railways sleeper we found a few months back. I was really worried about supporting her and you’ve just solved that problem. Fortunately, we have brick walls at home so I don’t have to try to find studs.
Thanks, Michelle! My husband is amazing at just figuring out things. I’m more the idea person! Works out well!
Thanks for sharing the great unique and amazing use of Barn wood we have some barn wood in our house will try to follow your instructions.