Repurposed Pie Pans with Photos and Recipes
This post may contain affiliate links which won't change your price but will share some commission. Read more here.Showcase your favorite family recipes and photos in this nostalgic repurposed pie pans display. Easy way to add photos and memorabilia to your home decor!

I have a deep love for photographs. As a scrapbooker of almost three decades, photos have been the way I’ve captured my love for my family and our life together.
Since I was a stay-at-home homeschooling mom for over 25 years, I had lots of opportunities to create memory making moments.
So many photos, not enough time. But I believe we can incorporate photos and memorabilia into our home through unique decorating ideas.
I don’t know about your family, but ours has specific recipes that are served at the different holidays. Read – you don’t vary the Thanksgiving menu!!!
When I think of my mom I remember two desserts she made every Christmas – coconut cake (for my dad because I hated it!) and nut cake.
I’ve never actually made the nut cake because I’m sensitive to them, but I wanted a way to honor my mom and this memory. (My mom and dad passed away in 2010 and 2009 respectively.)
You can tell how much a recipe is loved by the smudges and stains!
To me, old pie pans (or tins) provide the perfect opportunity for one-of-a-kind home decor!
***Check out the end of the post for more projects from Love Your Home Challenges!
Repurpose Pie Pans with Photos and Recipes
Materials:
(I’ve included some affiliate links for your convenience. Click here to read my full disclosure policy.)
Two pie plates (these can be old and repurposed or you can age new ones)
Photographs and/or recipes printed on regular copy paper
Mod Podge
Round white doilies
Craft brush
Brown stamp pad
Antique Bronze metallic paint
Paint dauber
Cleaner
5 inch wide burlap ribbon
Adhesive pop dots

Pie plates can be found at thrift stores, yard sales or even in your kitchen cabinet! If you can’t find any I’ll show you a way to make new ones look vintage.
Step 1. Clean your pie plates.
I like using this cleaner for almost any project I’m working on.
Step 2. Use a paint dauber to apply brown paint.

Apply metallic brown paint to select areas for a more vintage look. This process totally depends on how you want your finished piece to look.
Step 3. Use a dampened cloth or paper towel to remove excess paint and let dry.

Self explanatory!
Step 4. Find recipes and a photo to display in your pie plates.

Depending on how organized you are, finding your photos or recipes can be easy or difficult! Once you have them, print duplicates on regular copy paper using a copy machine or scanner.

If necessary, use a photo program that allows you to enlarge or shrink the pictures.
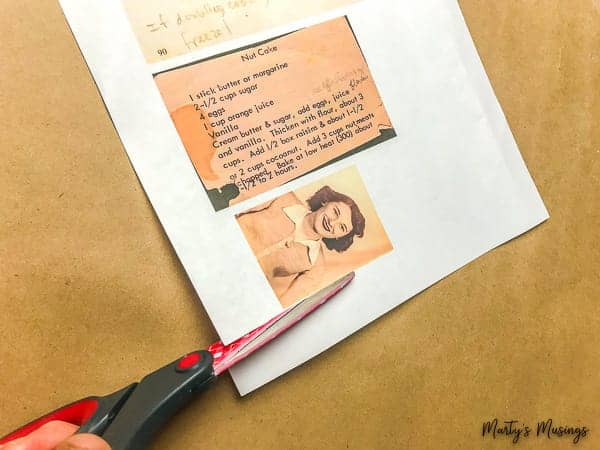
I chose to use a photograph of my mom, her nut recipe and our family favorite Broccoli Casserole.
Step 6. For recent photos and clean recipe cards, try aging the image.

This can be done through photo-editing software or by applying brown ink to the edges of the images after you print. I added a sepia filter to mine in Lightroom and also used a stamp pad to age the edges.
Step 6. Cut out pictures and recipes.
Step 7. Apply decoupage to doilies.

Brush decoupage on back of paper doilies and press onto the pie plates. Brush a second coat of decoupage over the top. You can use one large doily or arrange two more on the surface of the pie plate.
Step 8. Brush decoupage on back of photos and/or recipes and adhere atop the doilies.

Brush another coat of decoupage over the top and carefully smooth out any wrinkles with your hands. Let dry.
Step 9. Cut a length of wide burlap ribbon to hang behind the pie plates.
Cut a second shorter length of ribbon and crimp in the middle with a twist tie to resemble a bow.

Step 10. Use adhesive pop dots to attach ribbon to the wall.

Adhesive pop dots are the perfect scrapbook tool to attach your project to the wall without pulling off the paint.
Step 11. Nail pie tins through ribbon to wall.

If you look close enough you’ll see I just nailed it straight to the wall. You may need to drill a hole in the pie tin first if necessary.

I love the look of this repurposed pie pan memorabilia next to my chalk painted hutch.

Do you have any family pictures or recipes you’d love to try this technique with?
Now be sure to look through the other projects from 19+ other DIY bloggers as part of this month’s challenge!
I don’t know about your family, but ours has specific recipes that are served at the different holidays. Read – you don’t vary the Thanksgiving menu!!!
Hi, Emma. Yes, our family is the same way. Our Thanksgiving menu is written in stone!
What a fun way to add family history and design to your home!
It’s always fun to visit your blog and see your creative ideas, Marty.
Thanks so much for visiting, Meegan! Hope you’re doing well!
What a sweet way to honor family recipes. Thanks for sharing!
Thanks for visiting, Suzanne, and for the encouragement!
Oh Marty!!! I just LOVE this!!! Absolutely wonderful!
Thank you, Christine! It’s good to hear from you!
This is such a great upcycle Marty. The pop of color with the burlap behind it is beautiful! What a great way to display your Mom’s recipes.
Thanks, Michelle! It was a fun project and a great way to use memorabilia.
What a sweet idea to put recipes in pie tins. A great way to capture and keep those memories.
Thank you, Jenny! So glad you liked it!
I do have some old recipes that I could use for a project like this. What a great way to showcase something very special.
Hi, Sherry. I just love old recipes and photos as well! I hope you’ll have fun if you try this project!
Such a cute upcycle project! These would make great gifts too!
Hi, Lia. Definitely a perfect project for a unique gift! Thanks for the encouragement!
What a unique way to hold memories! Thank you for sharing!
Hi, Cherryl! Thanks so much for the encouragement! So glad you enjoyed my project.