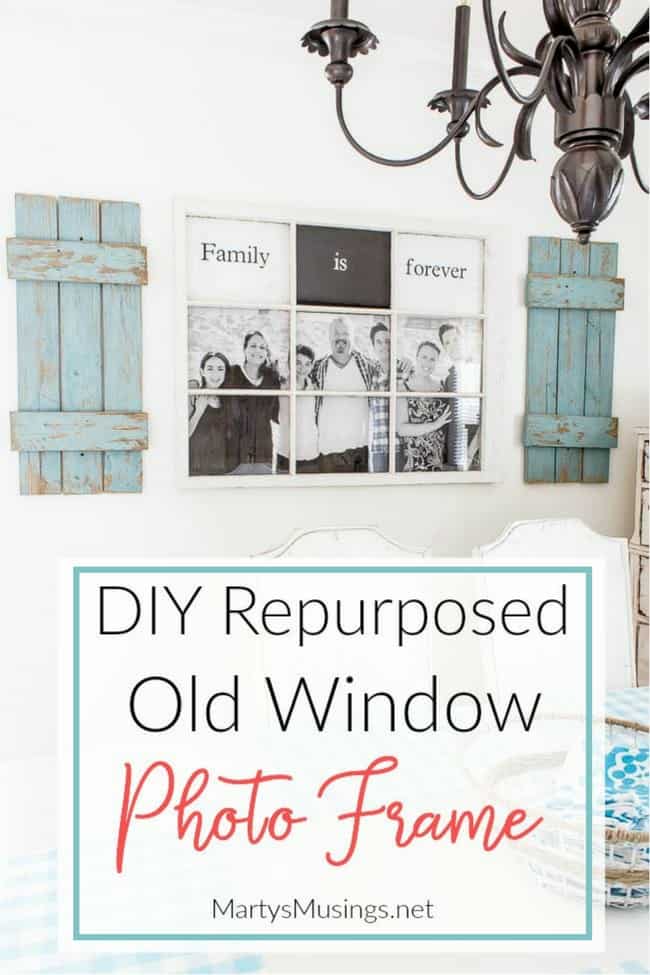
Old Window Photo Frame DIY Tutorial
This post may contain affiliate links which won't change your price but will share some commission. Read more here.This DIY tutorial turns a cast off window and an engineering print sized family picture into a repurposed, rustic old window photo frame.
As my decorating style has evolved my hubby and I love to repurpose things we find on the side of the road or at yard sales into thrifty new home decor!
When Tim came home with all these free windows recently I knew I could turn one into a fabulous (and cheap!) accent wall in our kitchen.

How to Create an Old Window Photo Frame
Materials
(I’ve included some affiliate links for your convenience. Click here to read my full disclosure policy.)
Old window (can be found at thrift stores yard sales or the side of the road!)
Photo printed as engineering print
Foam board
ZipSnip Cutting Tool
Black cardstock
Cricut die-cutting machine
Black vinyl (the only brand I like)
White vinyl
Staple gun
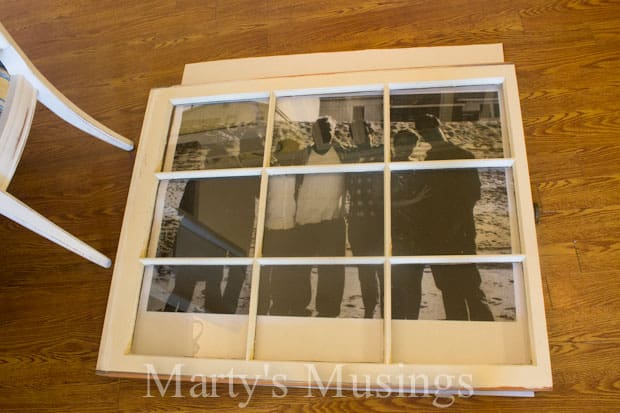
Step 1. Decide on photo, edit as needed and print.
The first step is deciding on which photo to use, how to have it printed inexpensively and then making it fit in whatever sized window you use.
Believe it or not, the first picture I picked worked fine as a 24×36 engineering print. I ordered the print from Staples (cost $3.50). Online ordering says photos shouldn’t be printed as an engineering print but I did it anyway. I figured for less than $4 it was worth a try.
The first time I didn’t lighten the photo sufficiently in lightroom, but I could tell that the photo would work size wise in the window frame. With seven people in the photo I was trying not to cut someone’s head off! You know how siblings are……I didn’t want any hurt feelings!
I edited the photo, printed a second time and it worked perfectly.
Step 2. Paint and/or finish window
My husband took the window and scratched up the surface with a grinding bit. He then used a heat gun to further distress the surface.
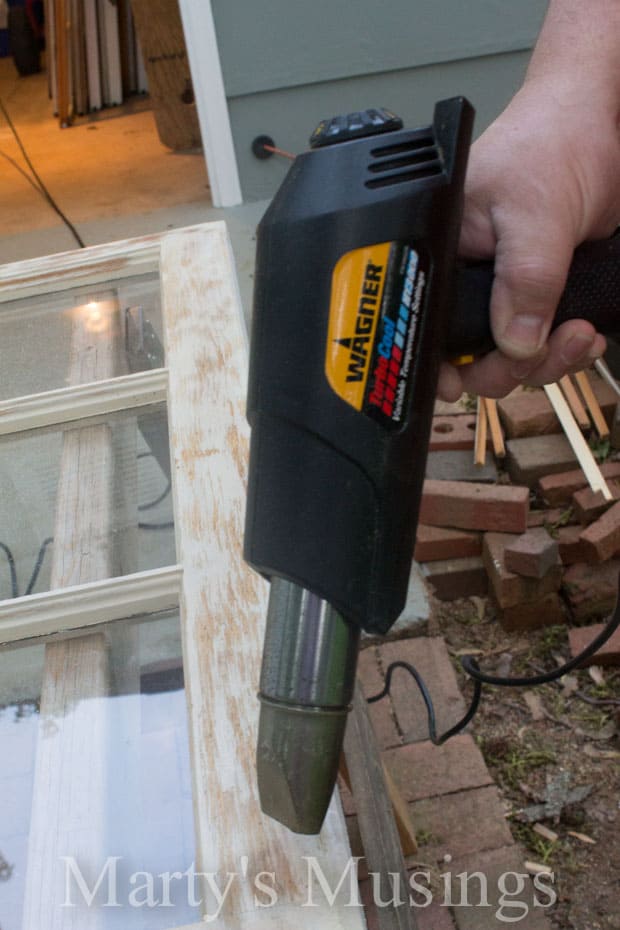
At this point the whites of the window didn’t match the white in our kitchen so Tim went back and repainted it with white aerosol primer and distressed it one more time.
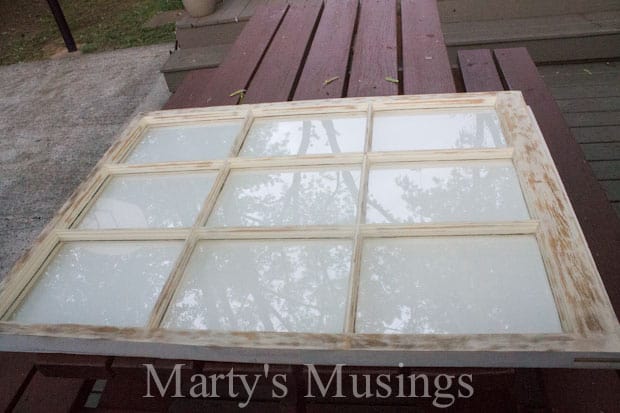
Second printing of the picture was perfect and the frame looks great.
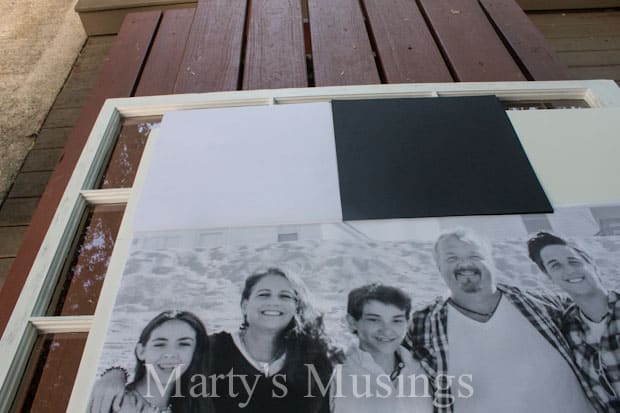
Step 3. Measure and cut foam board to fit frame
Using a rechargeable ZipSnip cutting tool (one of our favorite tools ever!) my husband cut the foam board to fit the frame.

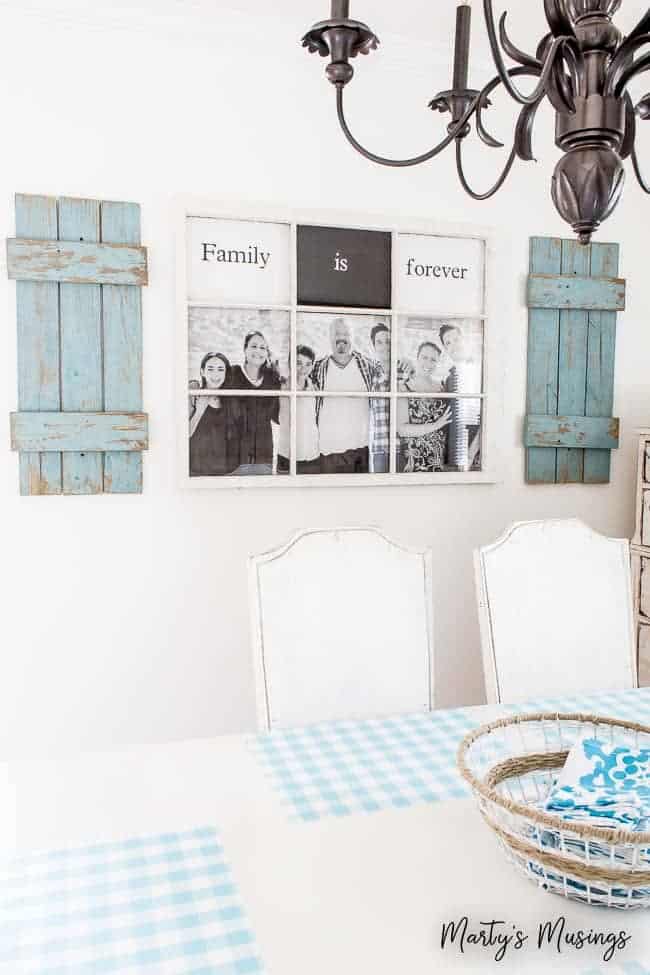
4. Add black and white cardstock to window panes.
Since the print didn’t fit perfectly inside the window I had to think outside the box! I used the print for the lower two-thirds and then added black and white cardstock to the top three window panes.
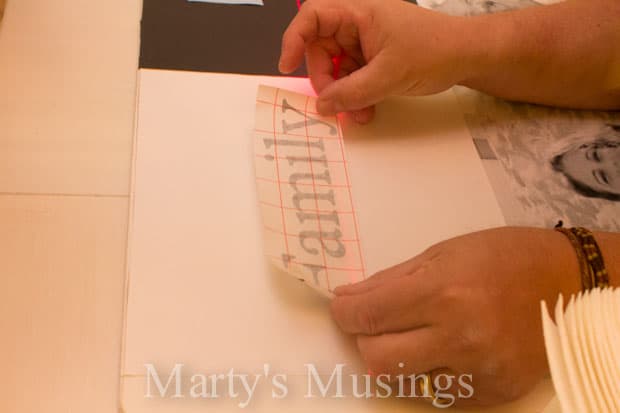
Step 5. Cut out family saying
I then used my trusty Cricut and printed the words “Family is forever” on black and white vinyl, adding the saying to the cardstock.
Step 6. Attach foam board to window
Once everything was secured to the foam board it was then attached to the window itself with brad nails and a staple gun.
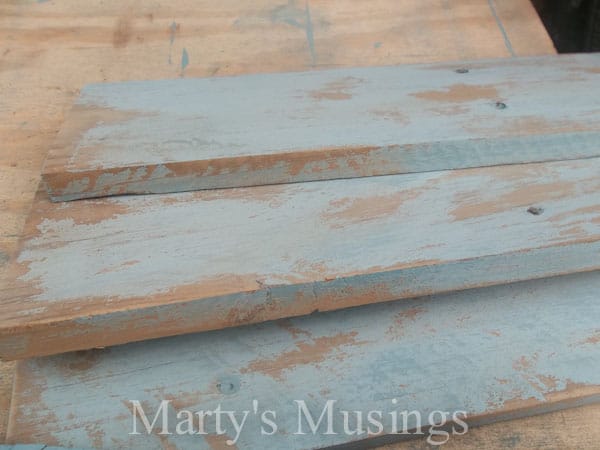
Step 7. Cut, sand, clean and paint old fence boards
The next part of the project was cutting, lightly sanding, cleaning and painting old fence boards to create a farmhouse shutter affect. (You can read all about our DIY Plank Accent Wall and 7 Chalk Painting Tips for Beginners for more details on this type of process.)
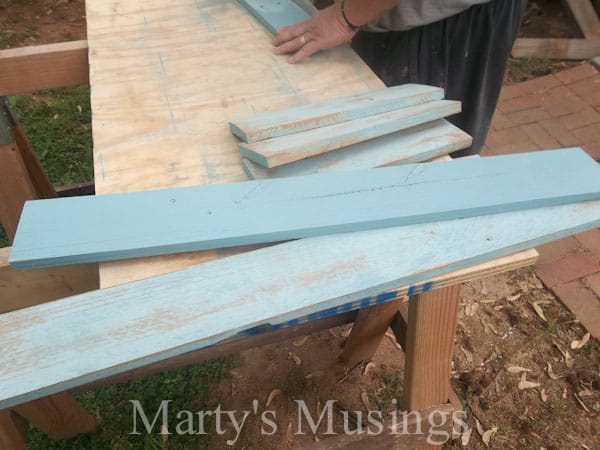
The boards were then sanded again with a palm sander, heavily distressing the boards.
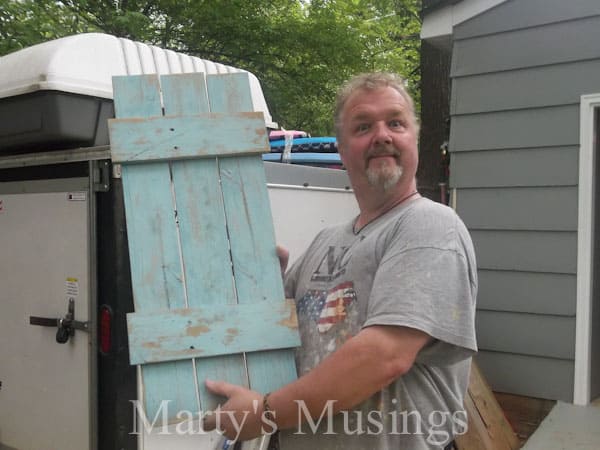
Step 8. Assemble wood
The wood was nailed together with finish nails and was then ready to hang in our kitchen.


My husband should definitely be proud of his ingenuity!
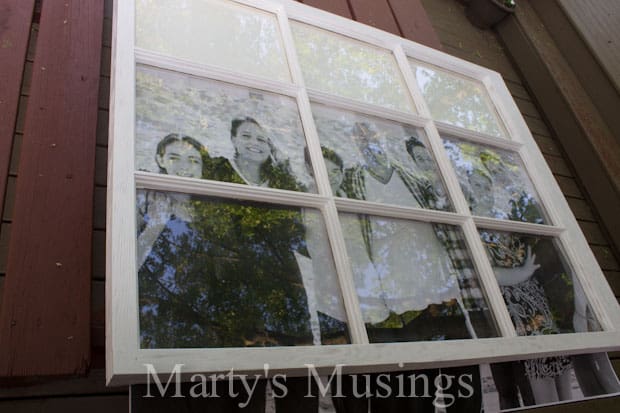
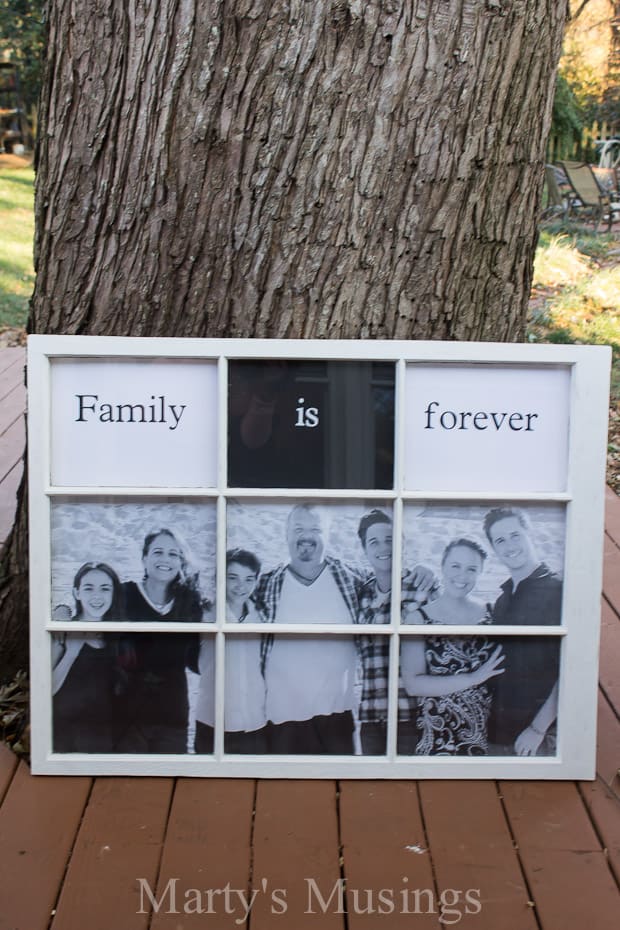
Here’s our completed old window photo frame.

Our family photo is encapsulated in black and white for us to see every time we sit down at the dinner table (or play games or homeschool or any of the other myriad of activities we share at the kitchen table.)

I couldn’t be more pleased with the way this turned out. It takes up an entire wall in the kitchen and is the perfect addition to our makeover.
Cost of this old window turned into photo frame:
24×36 black and white engineering print: $7.00 (I didn’t get it right the first time so I had to pay for two)
30×40 foamboard : $7
window: free!
Ever since my husband made a fabulous coffee table out of an old window we’ve been on the lookout for old windows. Check out my post on our bathroom window mirror!
More Chalk Paint Ideas
Practical painting tips for the home that anyone can use, including chalk painting, accent walls and choosing the right colors.


Just an FYI… the phrase Family is Forever is a mantra of the Mormon church. A couple has to perform the masonic rituals in their temple that binds them eternally and will make them gods of their own world one day. They believe this to be true of the god of our earth also, that he progressed to be god from once being human. Do you really want that phrase hanging in your home? I left the LDS church 18 years ago and submitted to the true GOD of the Bible, eternally existent as God, my Savior, my LORD.
Hi, Ashley. I appreciate you sharing the info with me. We use this phrase to emphasize to our children the bond of family that is made through both biology and choice. Our spiritual walk is an important part of our lives that we live out in other ways. Since that phrase has special meaning for us it won’t remind us of those Mormon beliefs that are not part of our beliefs. Thank you for sharing with me.
Love the picture frame! What a great idea! 🙂
Hi, Jenn! I’m so glad you liked our family photo frame. It was one of those projects that I wasn’t sure would turn out but I love it! Of course, if I ever want to update the pic I’m not sure I’ll have a pic that works exactly!
Where did he get these Windows? I’m in need of one for someone’s upcoming wedding!!
This is super cute and a great home decor project that would look wonderful above my couch! I’ve pinned it to my big group Pinterest board – hoping it will bring you some traffic! Thank you for linking up at The Weekly Creative!
Smiles,
Melanie {reasons to skip the housework}
Thanks for pinning my old window frame, Melanie. It’s such a fun project!
[email protected]
beautiful project and beautiful display of your family picture and a lovely quote! you are very lucky to have these window frames 🙂 really beautiful project! stopping by this morning from Its Overflowing party! Ingrid
Thank you, Ingrid, for leaving a sweet comment on my old window photo frame project. It’s one of my favorites in my home! Have a blessed day!
What a fabulous way to show off the family photos! TFS 🙂
Thanks, Susan, for leaving a comment on my old window photo frame project. I hope you’ll visit again and find some other fun DIY projects and stories. Have a great day!
Marty
This project turned out so well. I think the shutters really make it. Pinning it and sharing it on Facebook, too.
And Tim has the coolest tools. I need that Zip cutter thingy.
I’m also wondering about distressing with the heat gun. I’ve never done that, but it sounds interesting. I have a $3 yard sale heat gun and I’ve used it to remove veneer from a piece of furniture. Would love to know how to distress with a heat gun.
Amy, I really wish Amazon would allow affiliates in NC because I could make some money promoting all Tim’s
toystools!What an absolutely perfect project ~ I love it. Thanks for sharing. {pinning!}
That is so stinkin adorable! I love how you added the shutters!
Thanks, Coleen, for the comment on my old window photo frame. I love it so much! My hubby is the DIYer and I’m just the ideas gal (kinda mostly 🙂 but we’re a good team!
Marty
Beautiful! My daughter wants to do something similar but wants a large picture of Portland, Oregon at night. I like your idea! Beautifully done also. Linda
http://www.craftsalamode.com/2013/05/what-to-do-weekends-party-19-and-target.html
Hi, Linda! I would love to see it if your daughter does a photo frame similar to mine. I’m sure it would be beautiful. Thanks so much for visiting Marty’s Musings.
{Melinda} I LOVE this!! Love it! And even though my husband and I aren’t extremely handy, this actually looks like something I could do! 🙂 Any tips on where to find free window frames?
Hi, Melinda. My husband actually asked a contractor installing windows at a job site if he could have the leftovers they were hauling to the dump. They said yes and now we have a stack of windows! You can also find them on craigslist. Let me know if you make the project. I’d love to see it!
Marty
Thanks for linking to Take-A-Look Tuesday over at Sugar Bee Crafts – you were featured on Wednesday!
–Mandy, http://www.SugarBeeCrafts.com
was wondering…did you have to paint the wood blue or was it already that color and you just had to sand it? if you had to paint it, then could you explain how you did this to get this look? it looks great!
Hi, Sarah. Thanks for asking my husband a question! Here’s his response: The shutters were hand made from re-purposed fence boards. I gently sanded all the raw pre-cut wood to remove splinters and dirt, then painted them, still unassembled, with Annie Sloan chalk paint. After they were dry I sanded them quite aggressively with an electric palm sander on all exposed surfaces (not the backs). Then it was a simple matter to nail them together and attach to the wall! Really astonishingly easy…but don’t tell anyone!
Blessings,
Marty
This looks fantastic! It seems like it was a lot of work, but definitely worth it! 🙂
I love a project that preserves family memories. This one is very creative and quite lovely. The shutters are the perfect touch to highlight the window frame.
Hi, Donna! Thanks for leaving such an encouraging commenting on my old window photo frame. I do love preserving family memories (I scrapbook and do Project Life as well) but I’m loving incorporating special items/pictures into our home decor as well. Thanks for stopping by Marty’s Musings.
Wow, how creative! I’m going to pin this right now!
This is the CUTEST thing EVER!!! I love it! This is exactly my style and so very adorable. I MUST HAVE this. Can you come to my house?! Small road trip, right? Okay, so what do I do if a) Husband is not really hands-on in this kind of way and b)No time and c) Husband is not really hands-on in this kind of way–oh, did I mention that already?! You are so creative and an inspiration. PLEASE come to my home… 🙂
Hey, Linda! I just loved your comments on my window photo frame! I would love to come over to your house. Now where are you exactly? I’m sorry your husband is not quite as hands on as mine. We’ve never had much money so we’ve always had to come up with a way to get things done inexpensively. It’s only been these last few months that Tim and I have been creating together (never had time before!) You are a wonderful writer so just enjoy that form of creativity! And let’s plan a road trip!
Marty
Love this! A new Linking Party begins THIS Saturday over at Thet2women.com and we would love if you would link this up there on Sat! Thanks! Here’s the link:
http://thet2women.com/welcome-to-one-sharendipity-place/
I absolutely love this fabulous project. Now I will be looking everywhere for windows. This is such an awesome post. I would love it if you would share this post at our WIW linky party. Hope you can join us and Happy Mother’s Day! 🙂
Paula
ivyandelephants.blogspot.com
I love this idea and the shutters are perfect. Beautiful way to share family. Thanks tons for joining Inspire Me. Hugs, Marty
Marty, you must spend all your time writing nice comments for your linkup party! I am joining with 4 other bloggers to start our own party. Do you have any great tips for me?