Repurposed Rolling Kitchen Cart with Butcher Block
This post may contain affiliate links which won't change your price but will share some commission. Read more here.A repurposed rolling kitchen cart is transformed for use in a home studio. Chalk paint provides the color and Danish oil updates the butcher block surface.

Y’all know how much I love to save money! Mondays are trash day in our neighborhood and I’ve been known to drive (or walk) around the neighborhood on Sundays looking for treasures!
I’m also an avid yardsaler and thrift stores are my jam!
Facebook Marketplace and online groups are a bit newer to me, but they’re fast becoming my favorite way to hunt for bargains.
If you follow me on Instagram (especially my stories!) I shared about a rolling kitchen cart I purchased for $20. Of course, the nice man wanted $25 and I negotiated it down!
Often in these groups I’ll do porch pickup, which means I’ll leave their money under the mat or in the mailbox and the merchandise is there for me to pickup.
I wondered why the man I bought this kitchen cart from wasn’t willing to do this.
When I got to the house I discovered why! This sucker is HEAVY. The two of us barely got it up the driveway and into my car!
When you buy something sight unseen (except for pictures) you never know exactly what you might end up with. I can say this is one purchase I’m thrilled with!

You may know we took down a wall between our kitchen and living room and totally gutted the kitchen. I now have the kitchen of my dreams so where in the world would I put this rolling kitchen cart?
I’m glad you asked! In the last year I’ve been creating videos for a company I work for and shooting recipe videos for my blog. I’ve also been enjoying doing Facebook lives sharing my heart and favorite easy projects. (You can see them all here.)
It’s taken me a few weeks to get my video room just like I want it. Always technical problems! But I knew I wanted a place to put my computer which hooks up to either my iPhone or DSLR camera.
When I saw the kitchen cart on Facebook Marketplace I knew it was a jewel in the rough! My husband might have rolled his eyes at me, but I’m a firm believer in the power of paint and a little hard work!
The drawers are incredibly deep, as evidenced by the one basket that came with the kitchen cart. I ended up using this one for storage underneath and bought two smaller gray baskets that matched.

Repurposed Rolling Kitchen Cart
Materials:
(I’ve included some affiliate links for your convenience. Click here to read my full disclosure policy.)
Simple Green Cleaner
Palm Sander (one of my favorite tools for heavy sanding)
Sandpaper
Danish Oil
Rustoleum Chalked Paint in Aged Gray
Creme Wax, Clear (this isn’t the brand I used so read the details below!)
Two in One Chalk Paint and Wax Brush (specifically for chalk painting)
Paint Brushes (a basic inexpensive set)
Gray Storage Baskets
Step 1. Clean the top of the butcher block and kitchen cart.
I went ahead and used my favorite cleaner on the wood and rest of the cart. Lots of cobwebs!


Step 2. Sand the butcher block surface.
My husband has always been the handyman in our family, but I’m determined to learn more skills on my own. I knew I needed to sand down the surface of the butcher block far enough to smooth out the holes and blemishes.
You can see what the top looks like close up here.

Start with a 60 grit sandpaper and go up from there. The higher the grit, the better you’ll remove the problem spots. I used a 100 and 150 grit as well.

This is a tedious process but is so important for the finished look.
Step 3. Wipe down your piece of furniture.
After you’re done sanding you’ll need to take a clean cloth (I just use old torn-up t-shirts) and wipe your piece thoroughly.
Step 4. Apply Danish Oil to the butcher block with a clean cloth or brush.
Since my surface wasn’t so big I used a cloth so I could lightly apply as many coats as necessary.

Make sure you follow the directions for the specific oil/stain you will be using and apply as many coats as needed.
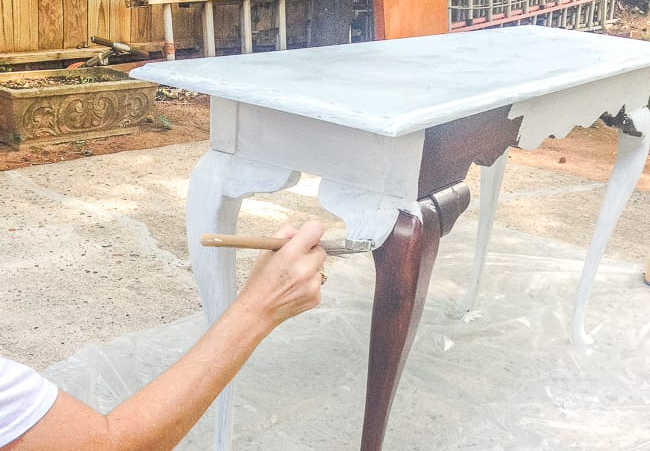
Step 5. Chalk paint rest of the kitchen cart.
Now is the time to paint the rest of the rolling kitchen cart. I used Rustoleum Chalked Paint in Aged Gray instead of my normal white.

You can see how I painted every inch of this unit, including the wicker inserts on the side. If I was a better painter I probably would have painted around those!
I just didn’t want to take the time to tape off the edges since this piece won’t be seen by very many people.

Step 6. Seal with wax.
I used Annie Sloan clear wax but I wasn’t extremely pleased with the way it interacted with the paint. Not sure why but I do know this brand is my favorite clear wax.

You can see the original basket filled with activities for my grandsons. A crafter has to do crafts with their younguns!
I thought the Danish oil worked perfectly and I’m pleased with my first attempt at sanding and oiling.

Here you can see just a snapshot of my video studio. When I film my computer sits on the repurposed rolling kitchen cart along with any ingredients for recipes or craft projects.

It’s amazing what a little bit of paint will do!
More Chalk Painting Tips
Tips and projects for beginners and pros alike that prove that anyone can learn to paint furniture and home decor accessories with chalk paint!


Wanna buy another ? I have this exact same butcher block cart with the 2 wicker drawers. Lol so glad I found this site though all jokes aside. The top of mine had some set in coffee cup stains and I’ve been thinking about sanding it down and painting or staining it again but after seeing what you did with yours has given me inspiration. Thanks!
Hi, Michael. Hope it turns out well!
What an amazing find. I bet the previous owners would be a little jealous if they see what it looks like now. So lovely.
It’s definitely a heavy piece with great function!
I love this – great find. I could use something like this for a coffee bar.
That’s a great idea, Rosemary! I love finding new uses for things!
Great find! Wonderful makeover for a additionla functionla piece!
Great find and a great makeover. I have never used Danish oil, it made the surface look great again. Well done!
Look great! Function AND eye appeal! Thank you for sharing.
Hi, Pat. Thanks so much! It’s definitely a great piece and perfect price as well!
Your work is always amazing, Marty! The kitchen cart transformation is so perfect and functional. Thanks for sharing!
Hey, girl! Thanks so much for commenting! This piece was a lot of fun to work on!
What a great transformation! I have always wanted a rolling kitchen cart, but we have a very small house, and there is just no room. I love that you can roll it around to wherever you need it!
Hi, Cherryl. It’s so funny but it doesn’t actually roll which isn’t a problem! I can scoot it around but it’s definitely a heavy piece!
This turned out so beautiful! Thanks for sharing this awesome transformation Marty!
Hi, Martina. Thanks so much for the encouragement. I’m very pleased!
Yes, it is amazing what paint can do. It looks like you have a brand new piece of furniture now.
Hi, Sherry. Thanks so much for visiting. Yes, paint is amazing and I’m married to a painting contractor!