Rice Krispies Treats Ornament
This post may contain affiliate links which won't change your price but will share some commission. Read more here.Don’t miss out on special family memories this Christmas! This Rice Krispies treats ornament is a perfect way to help your kids imagination soar!

Kellogg Company sponsored this blog post. The opinions and text are all mine.
One of my favorite parts of the holiday season has always been time spent in the kitchen with my children. As a homeschooling mom I’ve always made this part of the required curriculum!
All of my kids have grown up from their early years helping with the baking and then moving on to preparing dishes and complete meals as they got older. These skills certainly pay off for them (and us) later in life.
These days the Walden home looks very different, with only one student left in our homeschool.
This year I’m training the future generation!

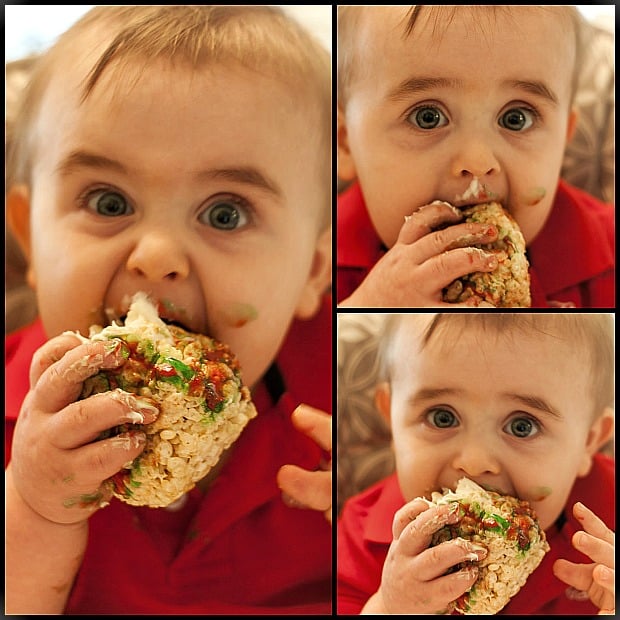
I keep my grandson Aiden on Thursdays and since he’s only one we haven’t spent a lot of time in the kitchen together yet.
Ok, we haven’t spent any time baking but we’ve spent plenty of time eating together!
He’s waiting on his Nana to get him a little treat!

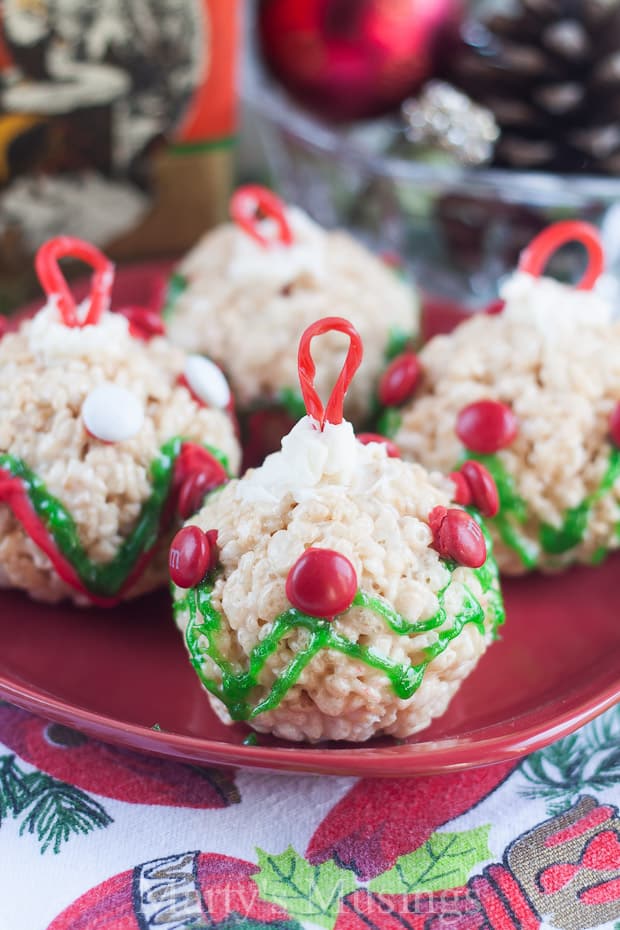
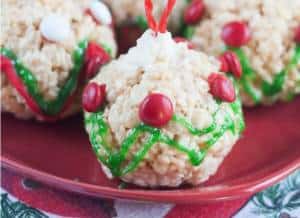
You may not be able to tell it from these pictures but this is a Rice Krispies treats ornament!
The holidays are the perfect time to set aside a few hours of fun with the family. Rice Krispies treats are also the favorite dessert of Papa (aka DIY hubby).
.
Aiden’s Aunt Sissy was my primary helper for the treats and mastered all of the decorating. I love to see how her technique for eating them is so delicate compared to the her dad and nephew.

After all, boys will be boys, no matter the age!
Rice Krispies Treats Ornament
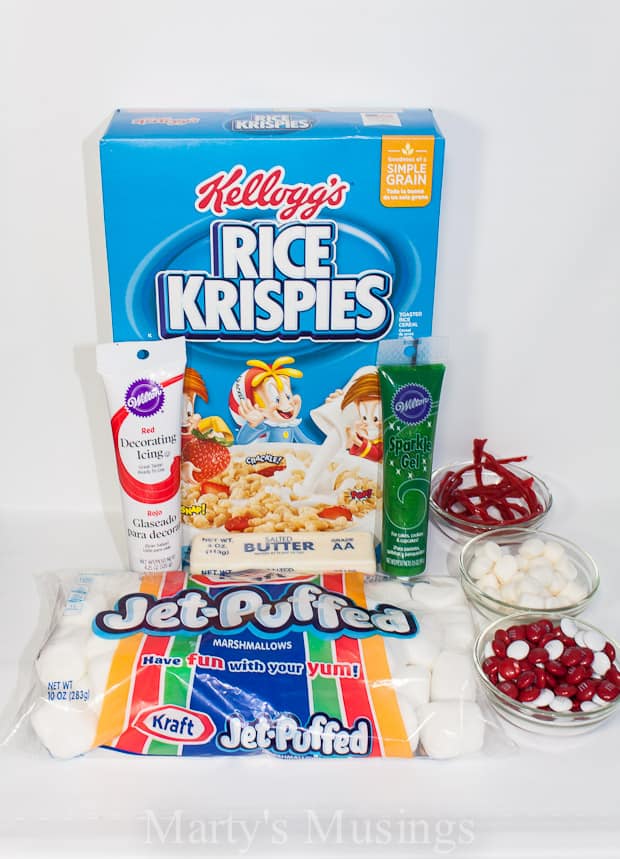
Here are the ingredients you’ll need for this recipe. I also ended up using white frosting instead of tiny marshmallows for the ornament hanger.
Use this ornament as a guide but let your imagination go wild. It’s amazing what children can create when given a few minutes of (supervised!) free time and a few ingredients.
Unless your children are older (school age or so) I would recommend making the 3-ingredient base ornament beforehand. It can be a little messy!
In the steps below you can see how I inserted and wrapped the Rice Krispies® around the licorice.
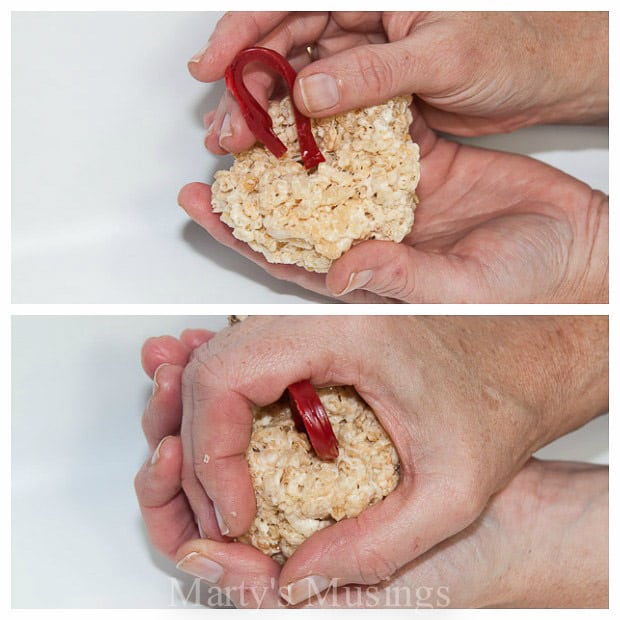
For me that was definitely the hard part. The recipe called for a tiny marshmallow for the hanger, but we didn’t like the way it looked as much.
Let your kids decide, but most of all, remember creativity should be encouraged! Bonus points that you can eat these as well!

Rice Krispies Treats Ornament
Ingredients
- 12 4-inch lengths red or black string licorice
- 3 tbs butter
- 1 pkg 10 oz. Jet Puffed Marshmallows
- 6 cups Kelloggs Rice Krispies cereal
- Frosting
- M&M candies
- any other candies or decorations desired
Instructions
- In large saucepan melt butter over low heat.
- Add 10 oz marshmallows and stir until completely melted. Remove from heat.
- Add Kellogg’s® Rice Krispies® cereal and stir until well coated.
- Using 1/2 cup measuring cup coated with cooking spray divide warm cereal mixture into 12 portions.
- Using buttered hands round each portion around licorice piece folded in half to form hanger. Seal tightly around licorice and allow to cool.
- Decorate with frosting and M&M’s or any other decorations.
Notes
-
Always use butter and fresh marshmallows for best results.
-
Store no more than two days at room temperature in an airtight container.
If you want some additional ideas for Christmas treats this is a great post. For more Rice Krispies fun check out my end of summer party, Easter egg nests and ice cream cake.

These look like fun! I don’t have young kids around anymore but I find my college kids love fun treats just as much!!
Hi, Susan. I think Rice Krispies appeal to all ages! Enjoy!
Adorable grandbaby and such a fun idea for the kiddos. Hugs, Laura
Thanks, Laura! That grand baby is now 7, unbelievably! Enjoy the treats!
Yum, Marty! I am so trying these at home. btw….your little grand is beyond precious! What a treat it must’ve been for you to share your Christmas treats with him.
Hi, Cat. That little one is now 7 and has a 4-year-old brother and a sister due any day! Time flies!
These are the cutest rice crispy treats I have seen.
Hi, Maria. They are really a lot of fun. Hope you enjoy!
Really cute idea for a holiday party classroom activity for the younger kids who haven’t developed their crafting skills yet! And love your models!!
Hi, Kate. That’s a great idea for a classroom. Messy but fun!
I could eat Rice Krispies for breakfast, lunch, and dinner and feel perfectly satisfied so this bit of deliciousness right here is going on my must-try list. I doubt they’ll last long enough to decorate but I’ll try hold myself back.
Love this, Michelle! Glad to connect with a Rice Krispies lover!
I have to try them! Your Grandbaby is so cute !! She has such beautiful eyes. This Rice Crispy Treats Jewelry is a great way to help lift my spouse’s imagination. All my children have been involved in baking since their early years and then as they grow up they have been able to prepare dishes and complete meals.
Oh my!!!!! Those are so cute and look yummy!!! I will have to attempt these! Your Grandbaby is adorable!! He has such beautiful eyes!!! He will be a lot of fun this Christmas!