Branch Candle Centerpiece for Fall Table
This post may contain affiliate links which won't change your price but will share some commission. Read more here.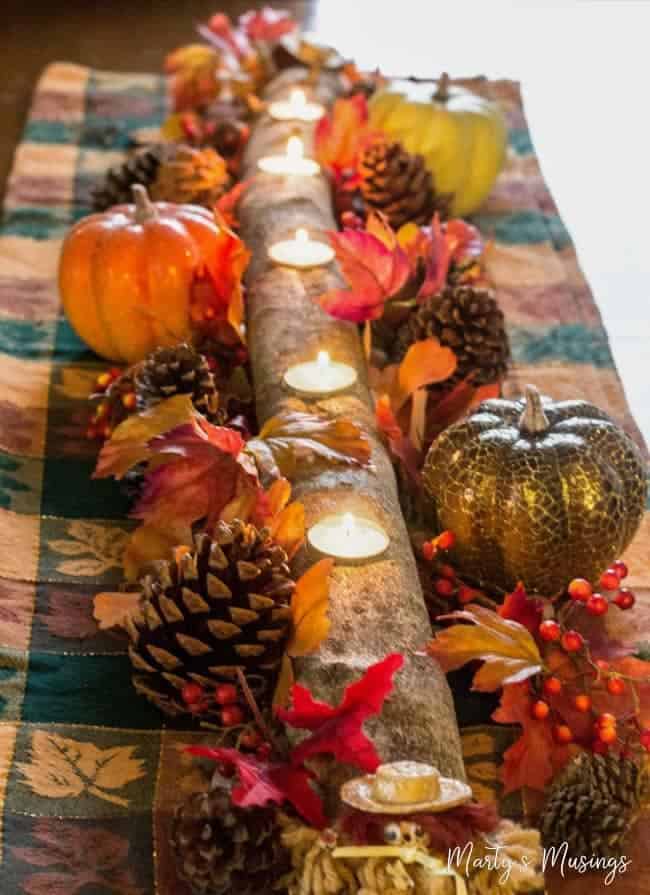
To further illustrate my love for all things Pinterest, I talked my hubby into making me a branch candle centerpiece much like this one. Here are his instructions.
From my hubby:
Not really a lot of rocket science involved here, once the proper branch is selected. Don’t be afraid to prune in order to get the right balance on the table – and leave some branch stubs for character! As for spacing the tea candles, I established center and then spaced evenly to the ends. BTW, lots of shavings generated, so do this outdoors.

I had a problem in that none of my hole bits were large enough. If you have a standard set, you will likely find that the largest is 1″ – not big enough for a tea candle. So, rather than make a hardware store run (where they know me by name now) I started each spot with a bit from a hole saw set, the kind that you use to cut out holes for door handles. It has a standard drill bit in the center – see the center hole? – and then a circular ring of teeth that cuts the circumference. I don’t remember the size, but it’s larger than 1″ and matched the tea candle perfectly. Lucky me!

The next step is a switch to the 1″ hole bit. This is placed in the same center hole you just made, but it cuts an entire 1″ hole as deep as you want to go. BUT BE CAREFUL! If you go too deep, you’ll either bury the candle or, worse, go all the way through to the other side. See next pic for a closer look.

Notice here that you end up with a 1″ hole and then a small ring of wood before you get all the way to the outer circumference.

Almost there, but the next step is critical to completion…

A necessary switch to a wood chisel now, because we need to remove that last little ring of wood. Set the chisel in the bottom of each hole and tap with a hammer, going all the way around. Clean the bottom of the hole and drop a tea candle in to check the depth. You may find that you need to go deeper, which means doing each step again in very small increments.
The top of the candle should be flush with the wood. Taller is fine, if you prefer, but I would not go deep and create a fire hazard. No need to seal or polyurethane – again, we are dealing with flames! Oh, and the branch I used here was from a huge holly tree. Just happened to have pruned it when my bride presented me with the idea!


Marty here:
Yes, my husband can make things, write about them, play the guitar and sing, take care of the kids and even make chocolate chip peanut butter pancakes. Yes, he’s amazing, and he’s mine. For 25 years now.

The table runner is actually a tablecloth folded over that I’ve had for years. I like glitter and glam so I love the sparkly threads.

I spent all of about $4 on the three pumpkins (Michael’s at 50% off, with 15% more with my teacher’s discount).

Pinecones=free, from God’s great beauty outdoors. The rest of the foliage was some I’ve had or purchased after the season at 80% off.
My most favorite part? These homemade scarecrows made by my oldest daughter (now 23) in our first year of homeschooling in 1997. Okay, I made most of it because she was, after all, only five. But it’s the thought that counts! They have been a part of our fall decorations for 15 years and are still cute today!

If you want to see more of my fall decor just click on the pictures below to be taken directly to the posts.
To see more of my husband’s projects go view the window table, table made of fence posts, pallet shelves and my scrapbook room.
I just love it!
Thank you, Alana!
Hi Marty,
Gorgeous birch candle centerpiece! Your hubby sounds like a darling for all he does. I’m visiting today from Time Travel Thursday. I welcome you to stop and visit me.
I have visited your blog and appreciate your leaving a sweet comment for me!
This is just so pretty. I just love autumn decorating, and this is a great idea! Thanks for the post and great pics! Lovely!
Thank YOU for stopping by!
Absolutely Gorgeous! Fall is my favorite season, and I love all warm and cozy decorating ideas out there. You did a great job with this festive centerpiece — it turned out so pretty!
Thank you so much. I adore fall as well, my very favorite season.
What a beautiful fall centerpiece!!! I love fall decor! Its got to do with all the beautiful rich browns and oranges!
Kudos to your husband as well 😉
I am hosting my very first “Inspiration Wednesday Link Party” and would love if you shared your tutorial with my readers! I hope to see you there,
Kristina
http://madaboutorganizing.blogspot.ca/2012/09/Inspiration-Wednesday-Link-Party.html
Thank you for the compliment. Yes, my husband did good!
I love, love, love this. Breaches are so much fun for the fall or winter seasons. Thanks for sharing.
Thanks for visiting my blog!
Cool! Love autumn colours and this centrepiece looks fab.
Thanks, Wendy! Hope it’s getting cooler where you are. I love fall!
I love seeing people that actually make stuff they find on pinerest, it gives me hope that I’ll get to it one day 🙂 This is one of my favorite fall pins, it’s so simple (decorative-wise) but beautiful.
Yes, we have actually made a few pins (recipes, DIY, home decor). I am a Pinterest addict and love the creative ideas I found there. Thanks for stopping by!
Your hubby did a great job on the candleholder, and it looks wonderful with all your fall goodies around it.
I love natural elements from the yard and woods too, screams fall to me! Happy Fall to you!
Blessings, Nellie
Thank you so much, Nellie. I’m blessed with a husband who’s handy because I am NOT! I’m lovin’ fall!
Beautiful branch candle centerpiece, Marty–so pretty paired with your fall tablecloth and pumpkins. And that hubby is a keeper–nice of him to put this project together!
That candle holder is wonderful!!! Lucky you to have such a talented husband! Thanks so much for sharing your talents at the Tuesday To Do Party!
Smiles!
Jami
http://www.blackberryvine.blogspot.com
Cute Mary! Found this at A to Z Stories!
Thank you for stopping by my blog!
This is just beautiful! Pinning now!
Thank you so much, Trish!
Love it! What a cool project. I’d like to invite you to share it at my party, Twirl & Take a Bow at http://www.houseontheway.com. It’s every Tuesday. Hope to see you there!
Leslie
Wow…this is so gorgeous! What a classy and elegant table
Hmmm. Guess I can’t follow via GFC. But I did pin this. Love it!♥
Thanks for the love on my centerpiece. Google Friend Connect is no longer but if you click on the RSS feed on my blog (the one to the right of the red p) it will give you options for adding my blog to a reader. Google+ is now what most people use. I’m working on learning how to do an email subscription, too. One step at a time! Thanks for visiting my blog!
SO cool! I love this idea! I am sure I can find a birch branch down in our woods. Today’s the perfect day to go out there and hunt for it. Can’t wait to make this. It looks lovely with all the other orange and browns and yellows surrounding it. Thanks for posting it! I’m following via GFC. Hope you can visit and follow back?
woww!! awesome craftiness!! thanks for this wonderful decor idea!! perfect for this season!
Thanks, Maria Ana! I am enjoying the beginning of fall weather and cooler temps! Hope you are, too. Thanks for stopping by!
Love this! Maybe I could get my nephew to make me one. Wonderful to have you at Seasonal Sundays.
– The Tablescaper
PS When you have a chance, please add a link to Seasonal Sundays
I added the link. Thanks for stopping by!
Beautiful! and a great Tutorial!
Thanks! I love my husband’s handiwork!
Thank you! Share and pin away!
WOW!! Your hubby did a great job! Love the centerpiece! It is so rustic yet pretty. Thanks for sharing. Blessings My Friend,
What a great hubby! Love your new centerpiece…..all the more special.
This is a great project. I love when we can take inspiration from others and come up with something like it too! You did a wonderful job with your candle log and the tutorial! Thanks… and thanks for sharing it with TUTORIALS TIPS AND TIDBITS!
Great Idea and your Husband gave directions and very helpful and detailed! The trick is to find a straight branch like the one in your photo. Very pretty fall arrangement!
Thanks
My husband is great at explaining things so I’m glad he helped!
Awesome job! That’s harder than you make it sound though…. I know I’d ruin it somehow! Hubby did a great job and you’ll enjoy this for a long time!
My hubby takes care of the building and I do the decorating. Great match!
I love your festive table . The log candle holder is wonderful and gives such a warm, cozy feeling.
~Diane
Thank you so much. I’ve enjoyed looking at it a lot! (Though the tub of fall decorations is still out and the rest of my decor isn’t done. Yeah for one completed project!)
You lucky girl! What a beautiful centerpiece he created! I also love to decorate with the crafts my kids made when they were little, I never get tired of them!
I am indeed lucky! Thanks for visiting my blog.
Now how cool is that!! You definitely have a keeper of a hubby.
Yes, I think I’ll keep him (especially if he keeps building things for me!) Thanks for stopping by!
What a precious husband you have! I love how this turned out! It looks so good and I love the little scarecrow 🙂 Thanks for linking up and sharing this idea with us!
Karin
Thank you for the kind comments and for stopping by!