DIY Sunburst Deck Railing
This post may contain affiliate links which won't change your price but will share some commission. Read more here.Want to add pizzazz to an ordinary deck? This DIY tutorial will show you how to build a sunburst deck railing with step by step instructions, including materials. Take your home from ordinary to extraordinary!
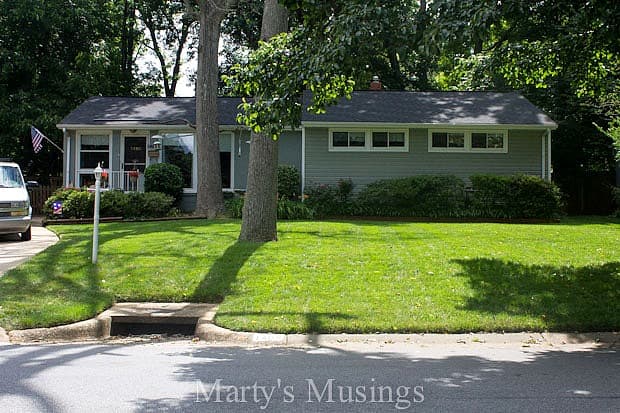
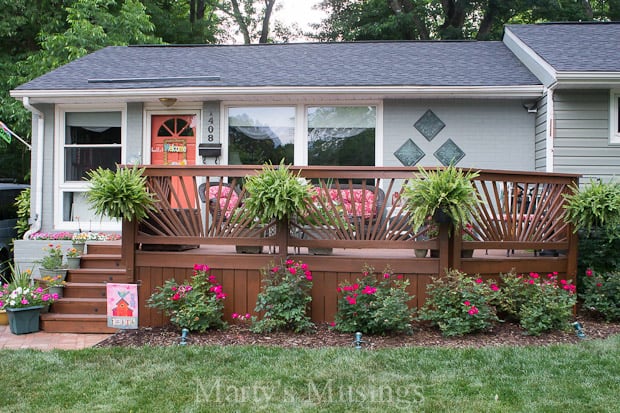
Our front deck project totally changed the look of our 1950’s ranch style home. Before we just had a “stoop” and stairs. No curb appeal here!
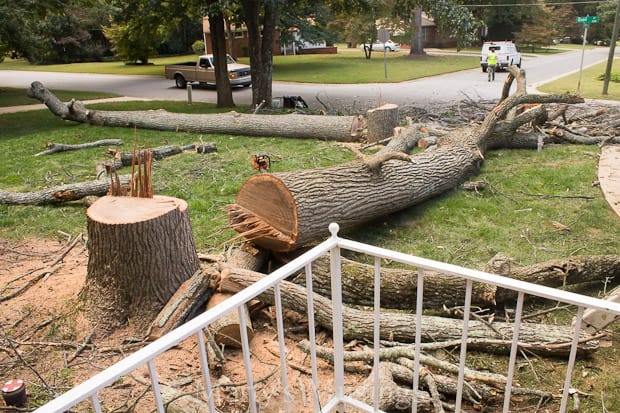
The process involved taking down trees (which was totally controversial.) Over the years we were constantly approached with estimates to help save us from costly damage in case of a storm. Tree removal was definitely a necessary but unwanted expense.
We do feel more secure knowing there is no longer a danger to our home in a storm.
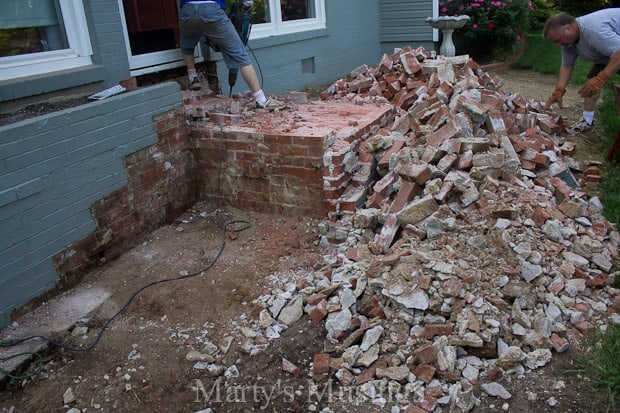
The second step was the jack hammer demolition of the front stoop and stairs so that the deck could go right over the stoop itself. Removing all the bricks was a family affair and quite the task!
We had a contractor help build the decking and stairs using our ideas based on the amount of available space. We wanted the deck just big enough to add curb appeal yet not feel like a second house added on!
We wanted this addition to give us the outdoor space of our dreams and add some much needed curb appeal.
My top priority was deck stairs that went straight to the front door, and that’s what I got!
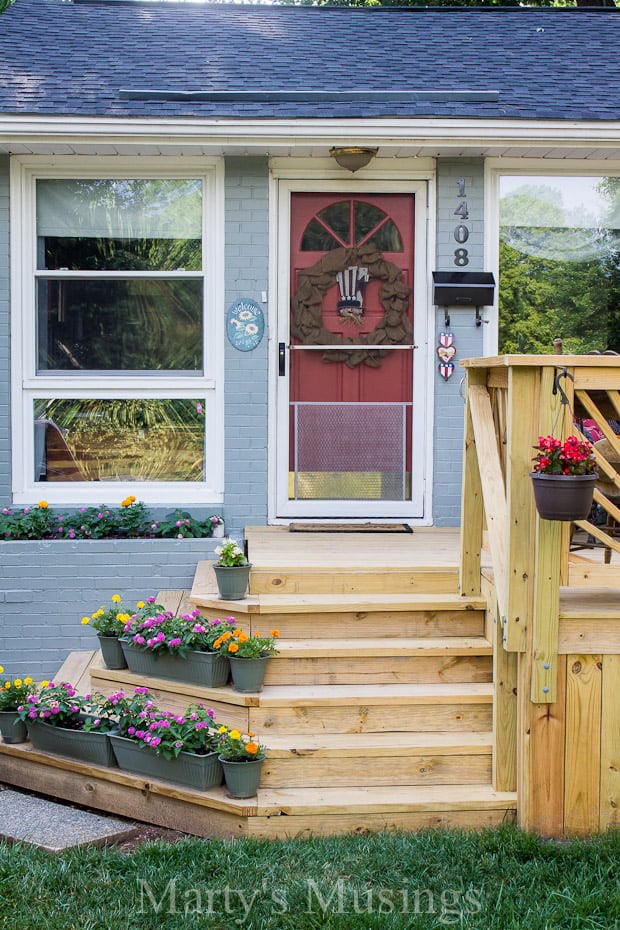
Since I am a true southerner (born, bred and lived here most of my life) I treated the deck surface like a front porch and used it to welcome everyone with a casual and homey feel.
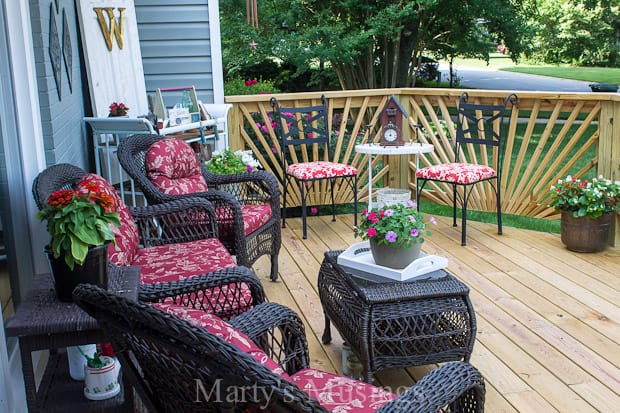
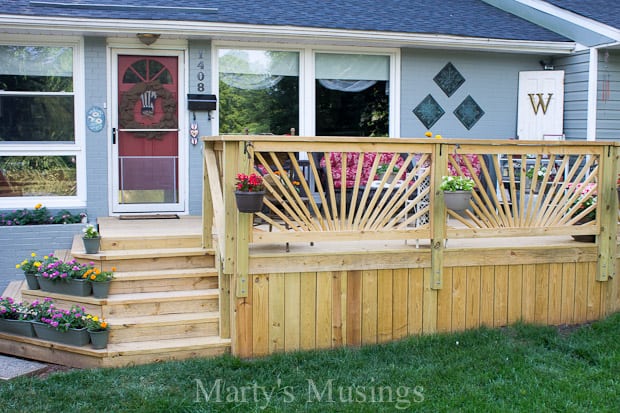
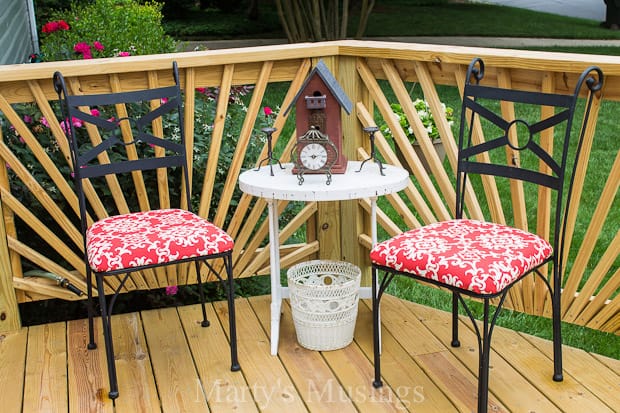
My very favorite part? The clever sunburst DIY deck rail. It was quite the task but the addition of the design brought our vision to life!
Sunburst Deck Railing Installation
My ex husband was not a finish carpenter so some of the more complex designs were a little bit beyond his skill level.. After some research, he decided on a sunburst design. Just another instance where you don’t have to know it all if you’re willing to just try something new!
So much time was spent talking through options and researching what might work best for this space. I’m the visual person and I could see the deck railing design in my head. My ex husband was the one who worked out every detail and built the projects.
And……sometimes projects don’t work out in real life like they appeared on paper or in our heads! (Read on for the adjustments and reasons involved!)
You should always check your local building codes for specifics related to deck and railing code requirements before you design and build your deck.
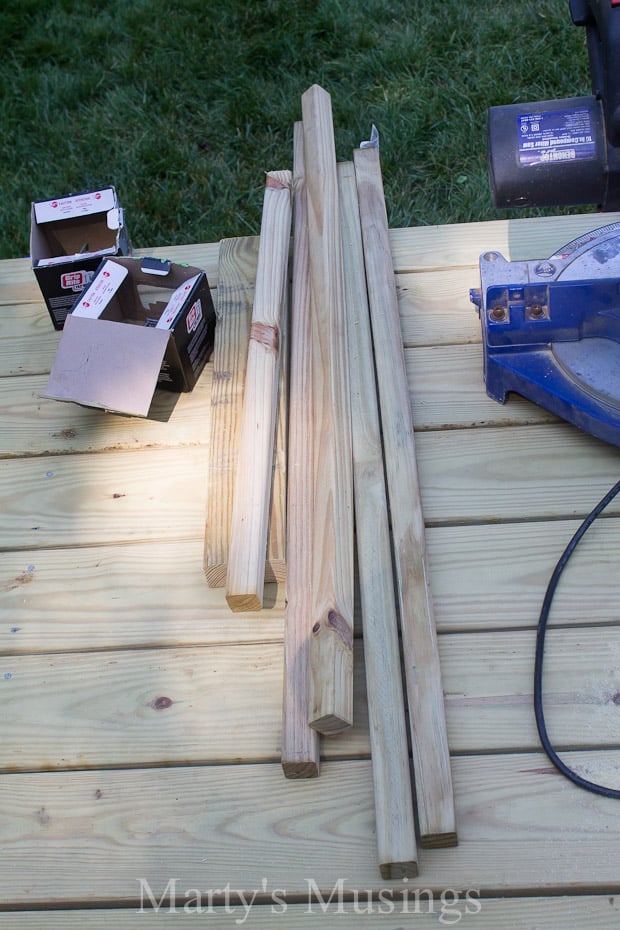
1. Gather materials
- Cordless Drill
- Deck Screws
- Measuring Tape
- Hammer
- Circular Saw
- Pressure treated wood to fit your own specific design
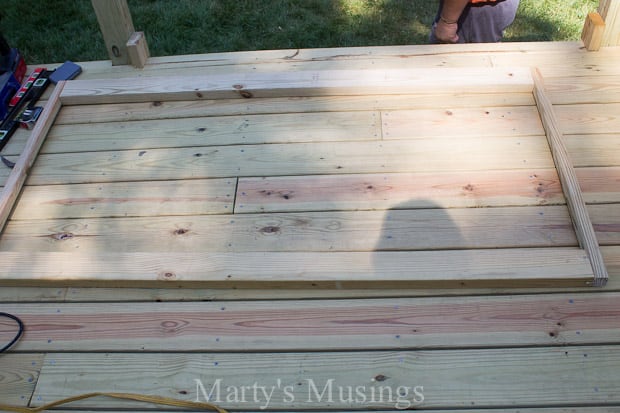
2. Build panels for railing.
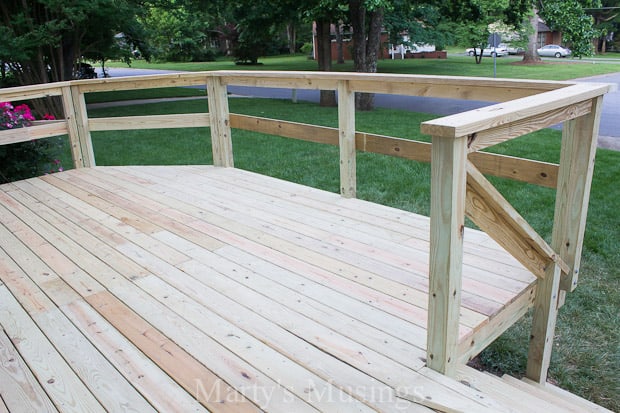
There are five panels approximately six feet wide and 38″ from the deck to the top rail. The horizontal mid-rails are only temporary.
Making individual panels, each on their own frame, would be a much easier build. Once complete, they would simply be inserted into the opening and attached to the posts with long screws.
This would also allow for easier maintenance down the road. The frames are 2″ x 4″ horizontals and raw pickets for the vertical and the sunburst rays.
This is the initial round of what would be about 30 8′ pieces! Lots of work to be done!
3. Decide on design.
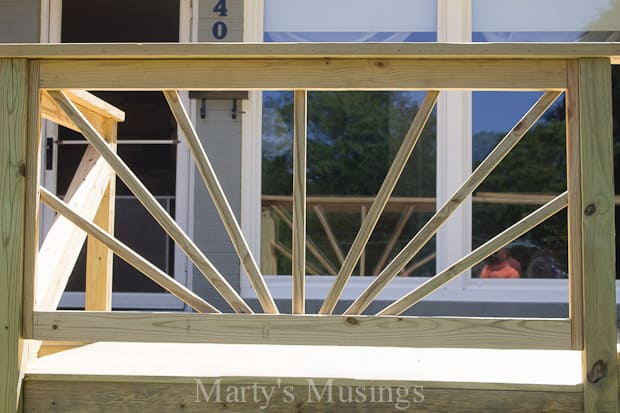
Experimenting with the design now, which would turn out to be non-compliant with local deck codes…but keep reading! The design that made the most sense was to go from center to each upper corner and then space everything else out in equal distances between those points.

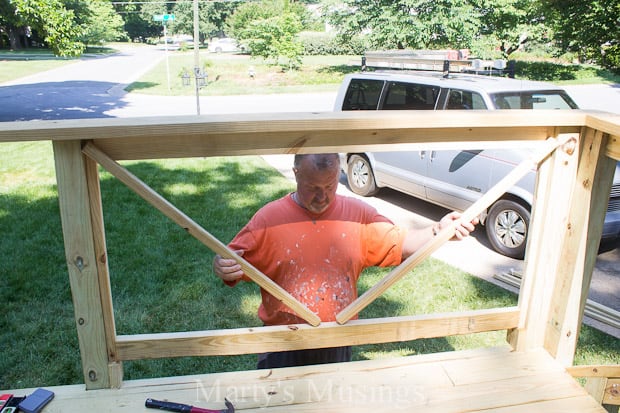
Roughing out the design gave me seven sunburst rays, which looked like a nice design.
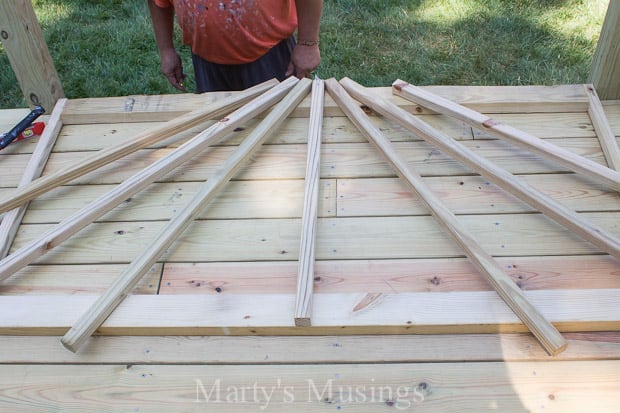
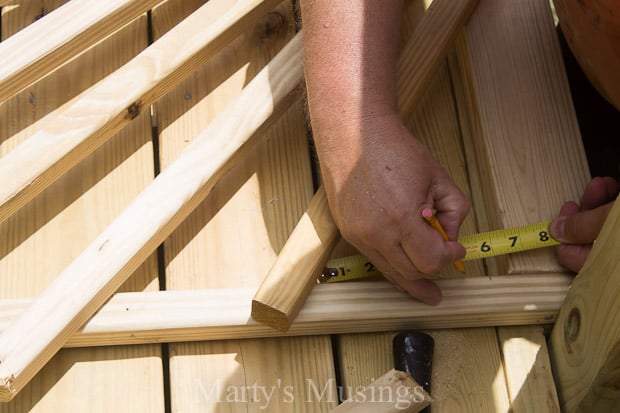
4. Measure, mark and cut pickets and nail to frame.
First came the marking and cutting of each picket and then nailing it to the frame with 2-1/2″ at the same time.
I also pre-drilled every hole so that the wood would resist splitting.
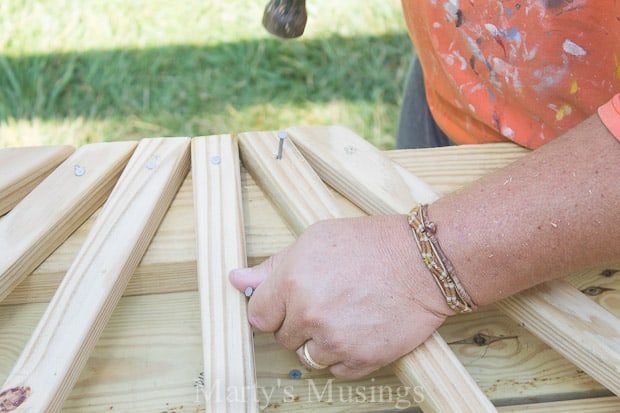
Measure, mark, cut, repeat. Again, at this stage, I was just creating equal distances between each picket.
And here is the first attempt! I chose to leave the more finished side facing the street and left a 3″ opening from the deck boards to the bottom of the design frame. This allows for debris to be blown off the deck under the rail.
5. How far apart do railing pickets need to be?
SURPRISE! The first design was out of compliance for spacing of railing pickets! They must be no further than 5″ at the widest point for safety reasons…don’t want a munchkin getting the noggin stuck.
SO, this called for a re-design. I would HIGHLY advise checking the code in your area first!
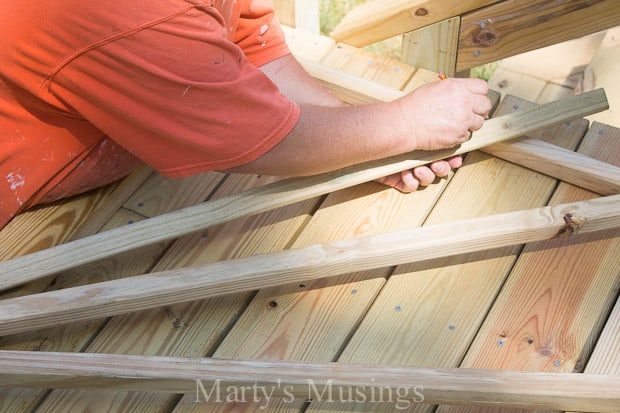
The second design allowed for compliance, spacing each picket no more than 4-1/2″ from its neighbor…that’s just how the spacing worked out for balance and symmetry. Again, measure, mark, cut, attach.
You can see here how each picket was left just a bit long.
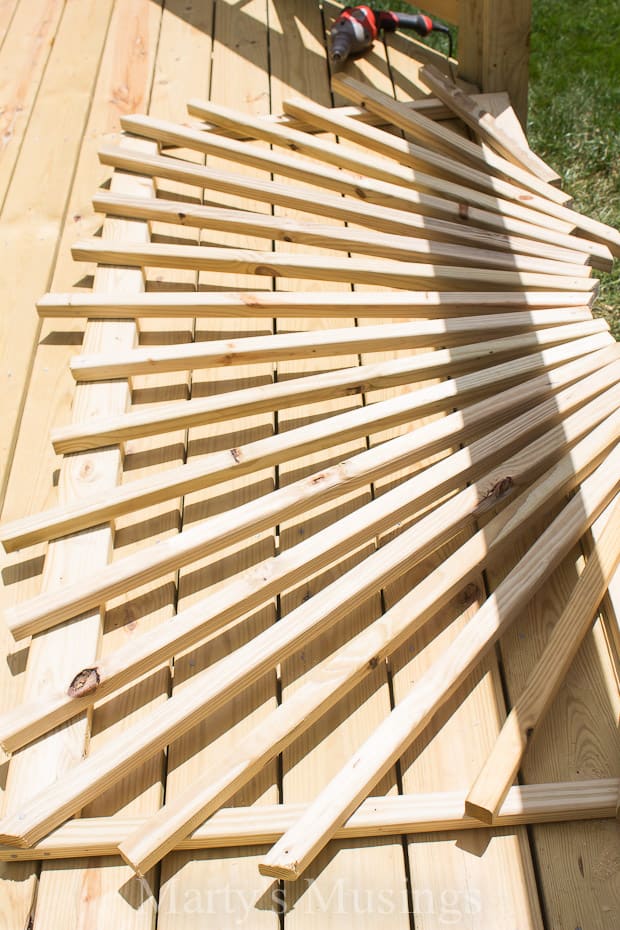
6. Cut off pickets at edge of frame.
Once nailed, cut all the pickets off right at the edge of the frame. The only pickets that stayed in their original locations were the center and the two corners. Everything else adjusted to them.

7. Make adjustments as necessary.
Remember, measure twice…cut once! Some minor adjustments were made because each frame was not the exact same size as the other.
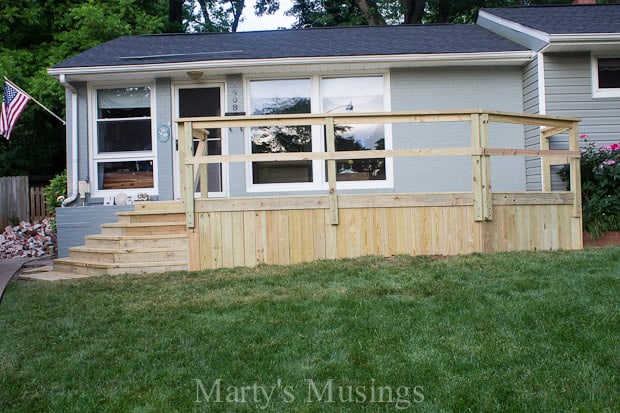
And here is the finished…and COMPLIANT… design! It is a bit more busy than we originally intended, but this design gives us substantially more privacy. So, we went from seven pickets to nineteen!
We have since established a flower bed with six beautiful red knock-out roses across the front. These should really soften the bottom part of the visual.
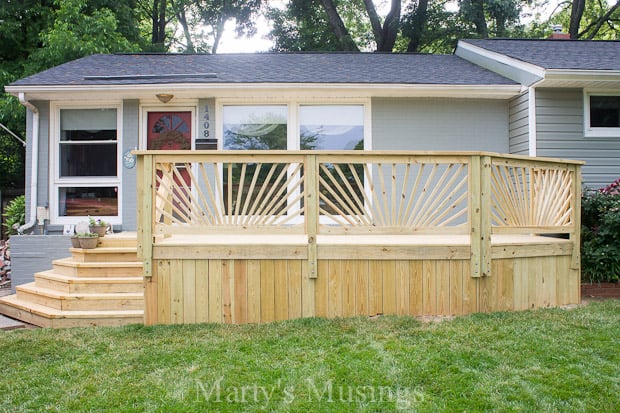
Here is the finished project. You can see how the skirting was created with wood to hide everything underneath the deck. This would also get stained in a few months.
8. What are some other designs for deck railings?
There are many other options for deck railings including the standard vertical pickets, craftsman style, turned baluster and even wrought iron. Composite decking is awesome if you can afford it because it lasts so much longer. Your choices may be depending on budget and style. Take the time to research your options first!
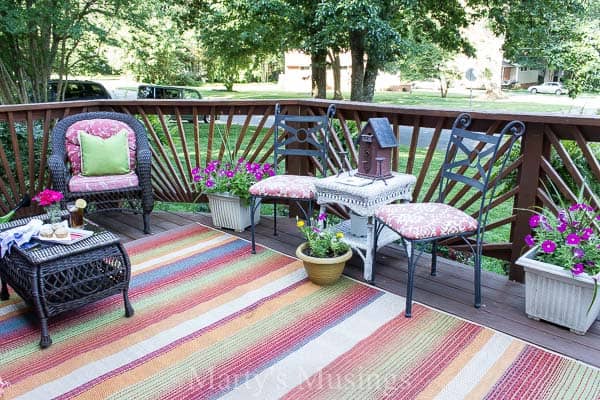
So many things to decide and ways to build a sunburst deck railing! I love the way the railing is accentuated with the pops of color on the deck.
Here’s a picture of it stained and decorated. What a difference!
Y’all come on by and set a spell!

More of our outdoor projects
- Entire outdoor living category
- Tree removal
- Jackhammer demolition
- Dream deck reveal
- How to stain your wood deck
- Curb appeal with a front deck
- Wood deck restoration
- Backyard patio ideas

DIY Sunburst Deck Railing
Ingredients
- 1 Cordless drill
- Deck screws
- 1 Measuring tape
- 1 Hammer
- 1 Circular saw
- Pressure treated lumber
Instructions
- Gather materials.
- Build panels for railing.
- Decide on design.
- Measure, mark and cut pickets and nail to frame.
- How far apart do railing pickets need to be?
- Cut off pickets at edge of frame.
- Make adjustments as necessary.
- What are some other designs for deck railings?
I love the sunburst deck surround. Exactly what, and what size, are the narrow pieces of wood you used to form the sunburst within the panels for the deck? Were the frames routed or was another board just fastened to the pack of the edging? Are the exact directions available?
Thanks,
Barb
Hey, what’s the width of each section on your deck? (approximate is fine!) Thanks!
Can you tell me the dimensions of the spindles – the width info waxh spindle is what I am looking for?
Looks awesome , love the sunburst design.
Thanks so much, Jimmy. We love our front deck!
Is there any way that I can be sent the specifics on the sunburst rail such as sizes of lumber used? Thanks
Hi, Harvey. We don’t have any kind of plans available for this project. Sorry!
I mitered the bottom ends of the rays so they would lie closer together. Boss wanted a lighter look, so I used 2x4s ripped in half for the frame. Easy, quick, and attractive. Thanks, Marty and Tim.
Hi, Billy. Thanks so much for the tips! I hope it turned out just like you wanted!
This project looks like quite a bit of work but I must say, the result is well worth it!
Great work.Very nice to see something different out there.Also seems like a design that could be used on many styles of homes.We can only do so much with vertical posts and I think I’ve seen most of them.
Love it
Your deck is gorgeous! Love the sunburst and the furniture. Thanks for sharing at the #HomeMattersParty – we love partying with you! Hope to see you next Friday. 🙂
~Lorelai
Life With Lorelai
It looks great, adds character to the whole house! Thanks for sharing with Thursday Favorite Things and hope you have an amazing weekend!
Your front porch looks great. Thanks for sharing your adventures!
Thanks so much, Cindy! We are definitely enjoying it. Glad you enjoy all of our “stories!”