Rustic Small Bathroom Remodel
This post may contain affiliate links which won't change your price but will share some commission. Read more here.This small bathroom remodel combines frugal tips on storage with DIY repurposing projects while creating a rustic, one of a kind space.
(I’ve included some affiliate links for products I used for your convenience. Click here to read my full disclosure policy.)
If you follow me on Instagram or facebook you know we’ve been in the middle of a bathroom demolition for several weeks.
We live in a 2000 square foot house that was built in the 1950’s. Need I say more?
The bathrooms are tee-ninesy. That’s Southern for “if you sit on the toilet your elbows touch the wall and your arms can reach the bathtub.”
And my favorite part? When you sat on said toilet the door opened into your legs, which was always fun when the kids were smaller.
Not.
We have not touched anything structurally in this room for the 22 years we’ve lived here.
Until now.
Dun dun dun
(cue the music).
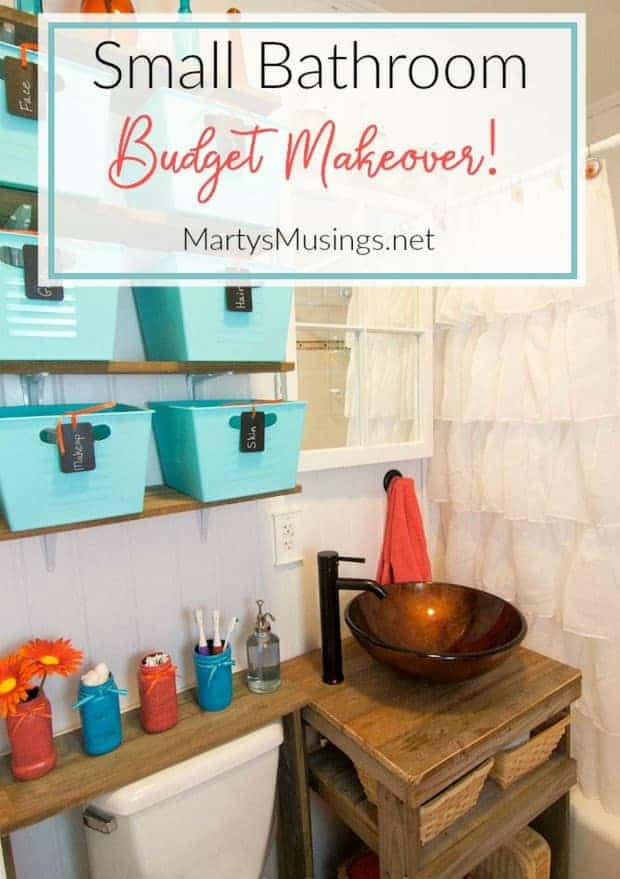
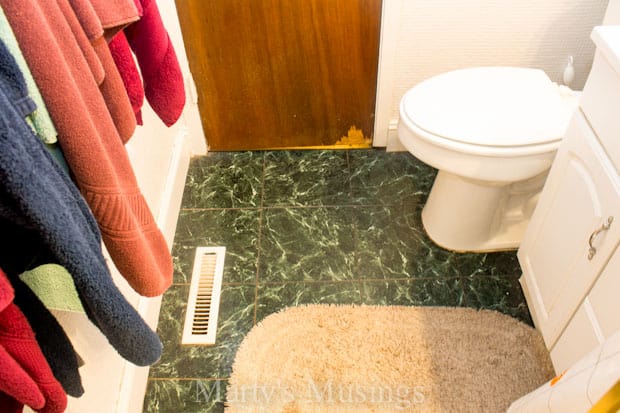
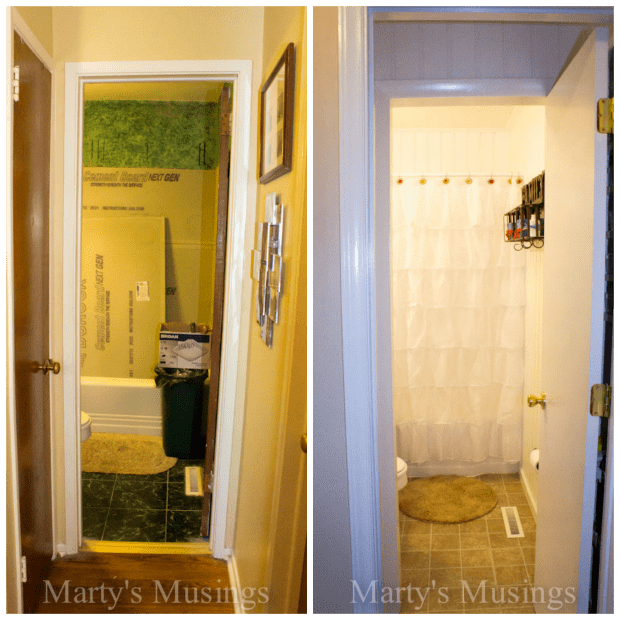
Say goodbye to green floor tiles, sponge painted walls and ugly wall tile.
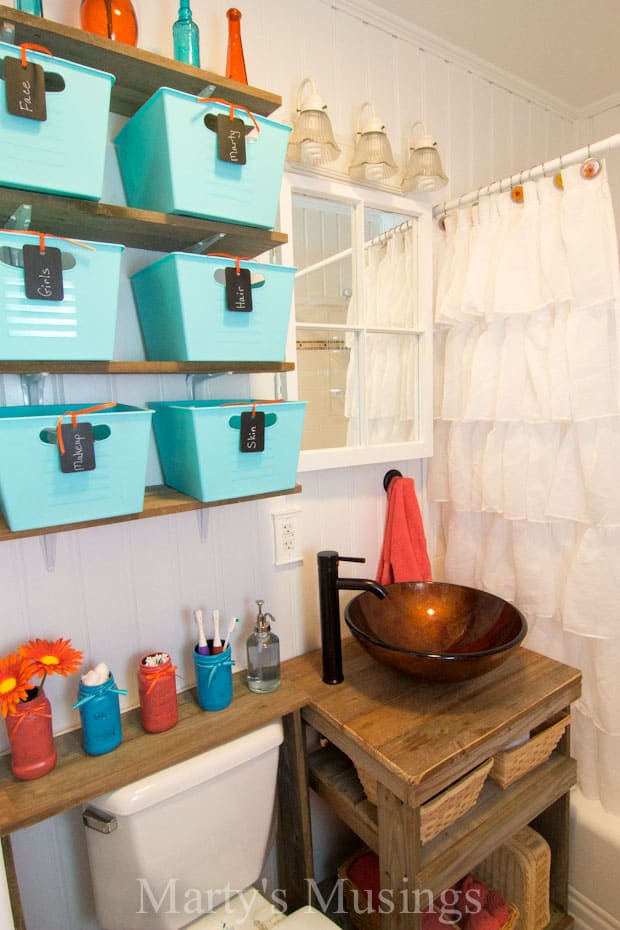
Welcome white bead board, fence board cabinet and shelves, new fixtures and thrfited accessories with aqua and coral accents.
I’m in love.
The whole reason for the small bathroom remodel? A leak behind the shower kit that was rotting the baseboard.
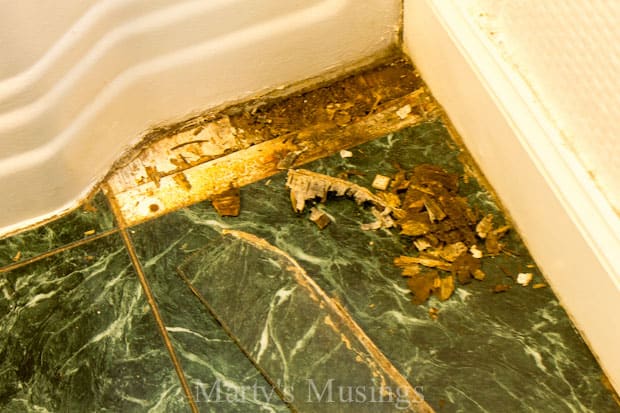
Even though the rotted area wasn’t as large as we feared, we knew it was an opportunity to tackle another DIY project from the ground up.
The only things that remained were the toilet and tub. Everything else? Gone!
The most important thing we did was enlarge the room and discover a source of surprising space. We removed the original door and Tim bought and installed a frame and casing and moved the door 3 feet farther out. This one move was the topic of many heated lively discussions.
I went with my gut instinct that this change would open up the feel of the bathroom even if it was just by a smidgen. That’s Southern for “just a wee bit.”

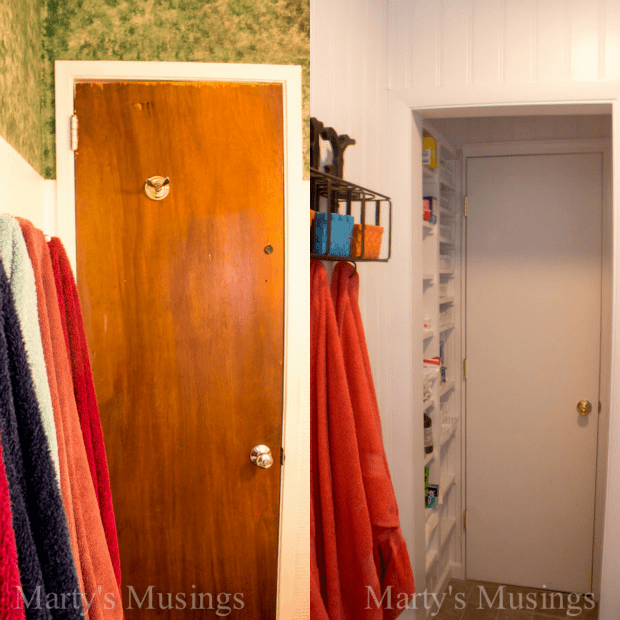
As you’re looking into the bathroom you can see that the door on the left is gone (now replaced with an accordion door) as is the original bathroom door.
Removing the shower doors, shower kit, sheetrock and wall tile, as well as painting the bathtub were an essential part of the game plan.
Total fun? A frilly shower curtain with new coral towels.
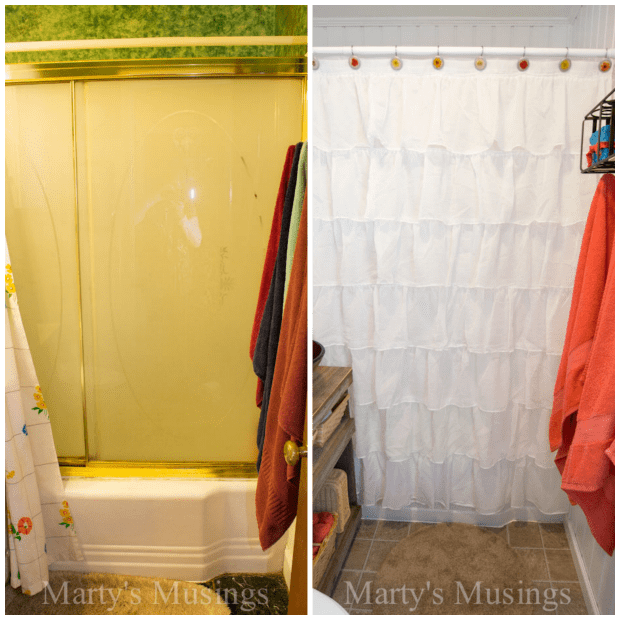
Tim has written a great tutorial on how he tiled the shower himself (parts one and two) with Bondera tile mat adhesive. The end product? Beautiful and totally professional looking.
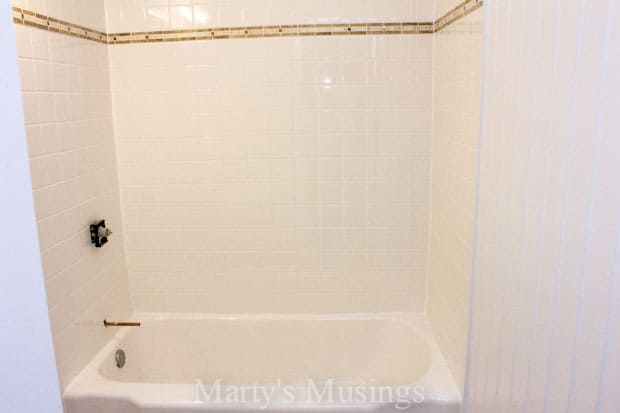
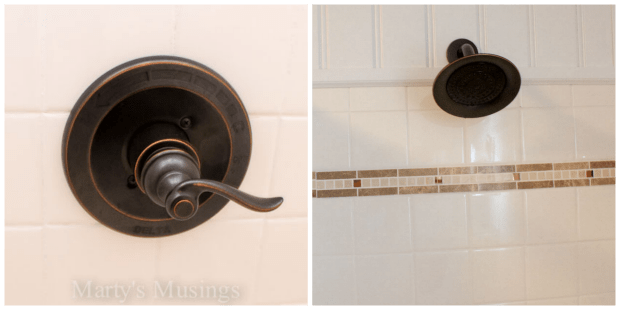
The shower fixtures were an oil rubbed bronze finish that stands out against the tile so well, and I love the new style!
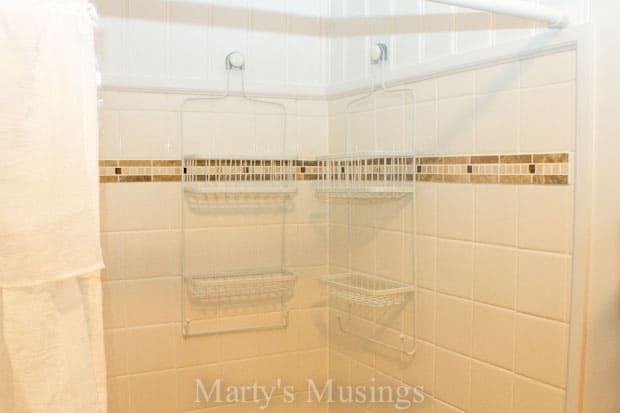
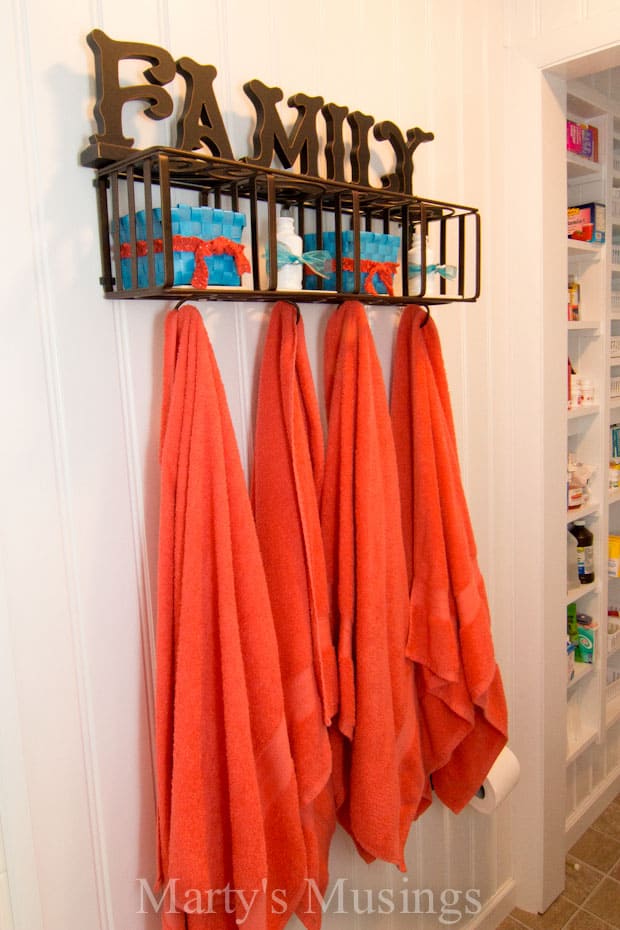
These metal shower organizers were the perfect touch to corral all our toiletries.
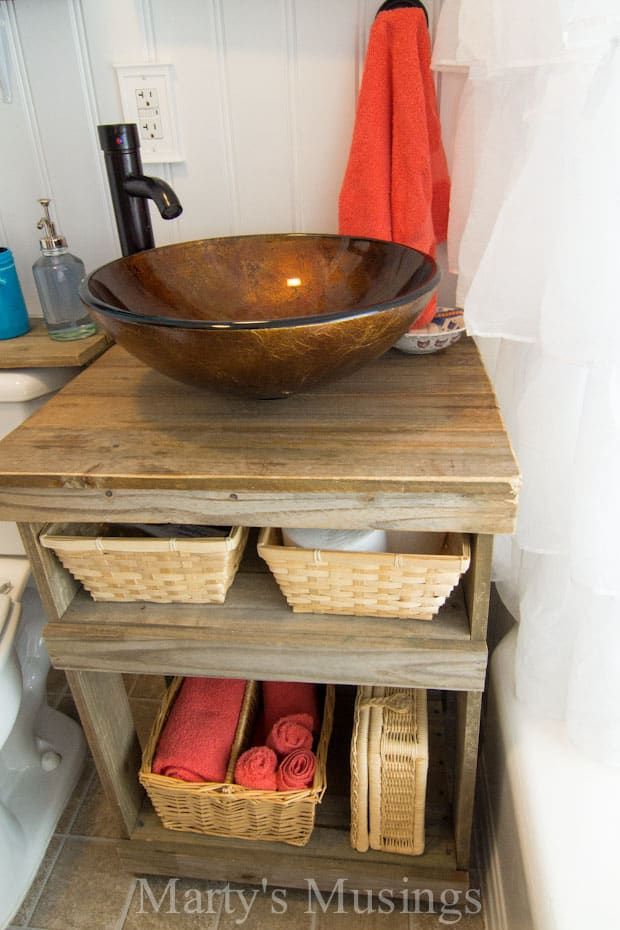
One of my most favorite parts? The new russet glass vessel sink, farmhouse style faucet and fence board cabinet Tim built.
Can you tell we have a thing for repurposed fence board projects?
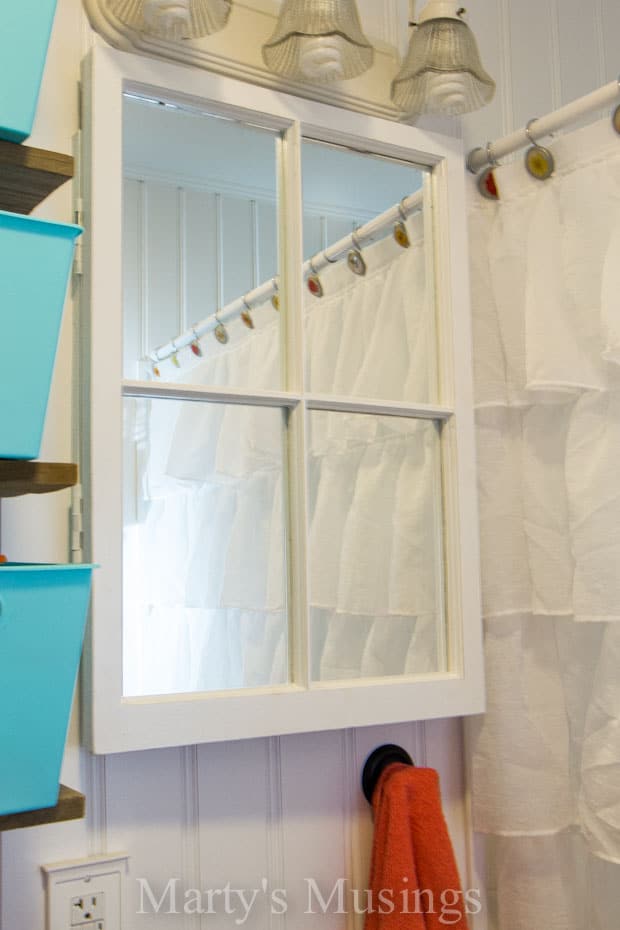
Did you spy anything unique above the sink earlier? Check out this old window mirror. Yep, we like window projects, too.
In this picture you can see Tim removed the cabinet above the toilet, built fence board shelves and an over the toilet tank stand for organization.
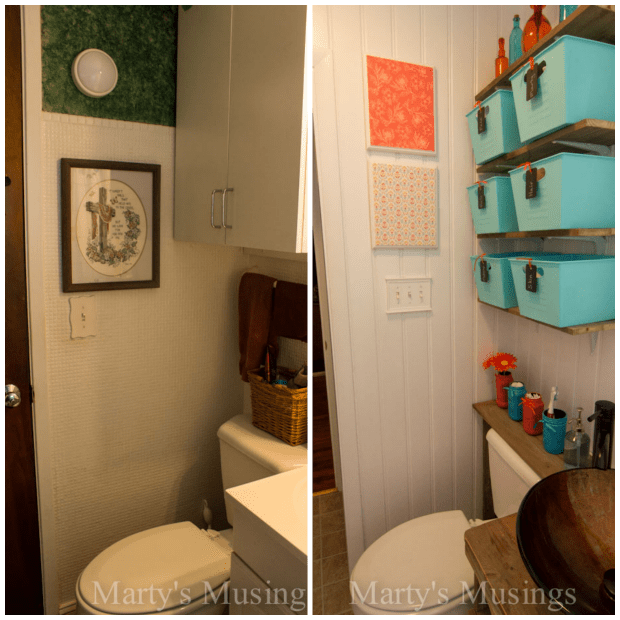
Then I got busy decorating with dollar store baskets and repurposed items.
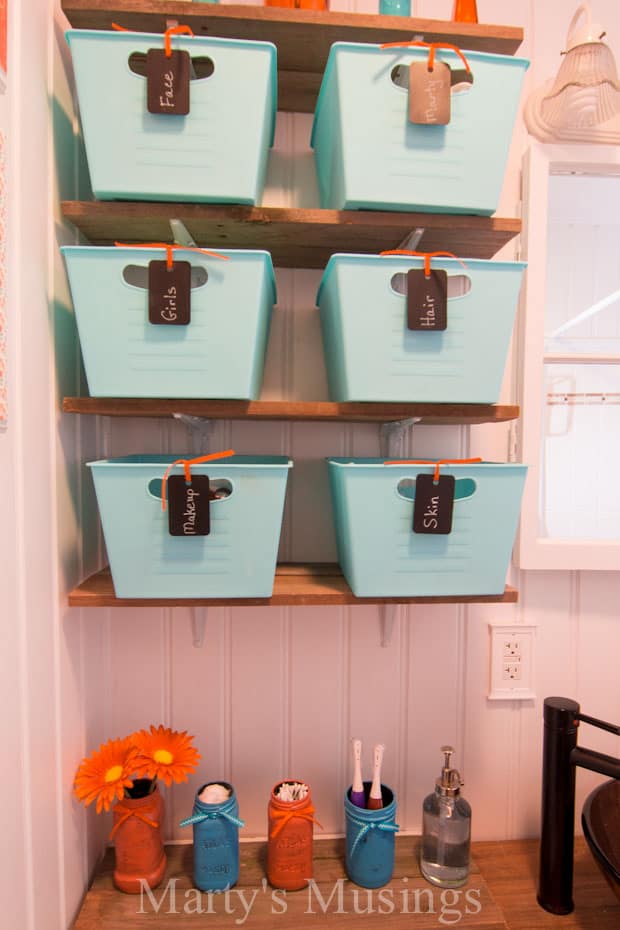
Did you recognize that this shelf is a cd rack turned on its side? $2 yard sale steal and I love it!
Total price of the remodel? Right at $2000. The biggest chunk of this ($750) was the plumbing labor to replace the internal lines and valves behind the wall and change the shower fittings. We worked on this everyday for about 6 weeks while Tim had a slow spell in his painting business.
 n
n
My hubby and I will be writing about this remodel for quite a while! There are so many DIY projects and fun things to tell you about.
We are confident that if we should need to sell the house in the future there’s a much better market now with one very functional (although tiny) and beautiful little bathroom!
Read all the posts in our Small Bathroom Remodel:
- Rustic Small Bathroom Reveal (you are here)
- Fence Board Bathroom Cabinet
- Bathroom Old Window Mirror and Glazing Tutorial
- Built-in Bathroom Storage
- DIY Shower Tile Part One
- DIY Shower Tile Part Two
- How to Install a Bathroom Exhaust Fan and Electrical Outlets
- How to Install Beadboard Paneling
- How to Install an Interior Door
Small Bathroom Remodel Source List
What a transformation! It looks absolutely stunning. The sink has got to be my favourite look, I haven’t seen anything quite like it and I think it’s fabulous. Where did you get it? Anyways thank you for sharing, this is one of the greatest renovations I have seen in awhile!
Hi, Roy. We got the sink off Amazon with the faucet. I’m glad you enjoyed our transformation!
Great job Marty! I agree that moving the doorway out makes it look bigger. The colors you chose are beautiful and the bronze fixtures… oh my! I wanted bronze for our house but it didn’t happen- I will get them in my next house though. 😉 Thanks for linking this up at Throwback Thursday! (Pinning)
Love the sink, and the baskets make a fun storage look!! You should come share this on DIY Sunday Showcase, a party I cohost. It opens at 5pm Sat!!!!
Shelly
minettesmaze.blogspot.com
Wow, what a makeover! I loved using reclaimed wood too. Thank you for sharing.
Thanks for sharing. What a gorgeous project. I LOVE your frilly shower curtain. Do you recall where you purchased it?
awesome! we have a late 60s home as well. Huge house…itsy, bitsy bathrooms. :-(. but looking to expand or work with what we have. You mentioned that you “painted” your tub. Can you provide more info on that?
Hi, Denise. Here’s my husband’s response: I purchased a refinishing kit from Lowe’s that was around $32 at the time. It contained a quart of one-part epoxy paint (gloss white), a cleaner that you mix with water and clean the tub with, steel wool, rubber gloves and a worthless brush. They key is getting the tub extremely clean and free of grime and soap build up. It is important to note that the instructions for this kit insist that the tub be cleaned and scrubbed with the steel wool and solution three times prior to painting. Do not skip any of this and go the extra mile with other products if you need to. Adhesion is the key to this while process. After everything dries out, simply brush on the paint with a good quality brush, but don’t go crazy expensive – you’re just going to throw the brush away when you’re done. It won’t come clean enough to ever use again. It is CRITICAL that you ventilate the work area!! Run a fan, open windows, whatever it takes. The fumes from the epoxy paint is overwhelming and quite dangerous. No smoking in the area as well.
Follow dry time and re-coat instructions and you should have a beautiful and very durable finish when done. Take advantage of the dry tub to re-caulk around the perimeter and floor if need be. One quart will allow you to do two coats, both inside and outside the tub, if need be.
I would HIGHLY recommend that you avoid using the aerosol finishes that are now available. You will have tremendous waste, exposure to fumes, and drips/runs that will make you swear like a sailor!
Good Luck!
A great post.
FC Bathroom Renovations Specializes in Renovating Your Bathroom.
For more information on FC BAthroom Renovations go to http://fcbr.co.za/
Love, love the bath remodel – there is one in my future soon! eek! I tried finding a tutorial for the sink base/cabinet. Nada. Is there one? Thanks so much
Marty, seriously?! Where do I start. The floor, the walls, the vanity and the mirror. Wait, the tub surround. I’m speechless with how amazing your transformation is! Nice job.
Hi, Brittany. Thanks so much for the great compliments on the bathroom, mason jar chandelier and our shower makeover. I passed them on to my hubby who did all the grunt work! We are just DIYing our way around the house and the bathroom was the biggest project so far! Not as huge as your kitchen but big enough for us!
I was at the Southern Bloggers Conference and heard you speak last year. Great job!